Scratch Blocks: Type, Categories, & Extensions
Are you looking for a way to help your kids excel in today’s world where there’s a growing demand for students to strengthen their critical thinking and problem-solving skills? Are you hoping to nurture their creativity and turn them into young innovators ready to conquer the world? If you answered yes to either of these questions, then Scratch programming may be what you’re looking for.
Scratch is a free graphical programming language and online community created by the MIT Media Lab. It was designed to help kids learn how to program visually with blocks that snap together to create groups of instructions, known as scripts. These scripts will control objects, known as sprites, in their projects.
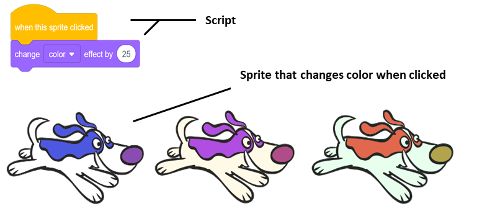 Programming (often referred to as coding) can be extremely fun. As your kids create their projects, they will learn about the logic needed to create fun games, animation and more. Their projects may start simple, but Scratch was designed in such a way that the possibilities are endless. The Scratch online community has MILLIONS of shared projects from around the world. Visit the Scratch website at https://scratch.mit.edu to create a Scratch account and check out some amazing projects shared by other Scratchers.
You may want to help your kids as they work their way through some of the details on this page, but with your help, this can be a good reference for them as they work their way through the various Scratch Camp badges.
Scratch 3.0 User Interface
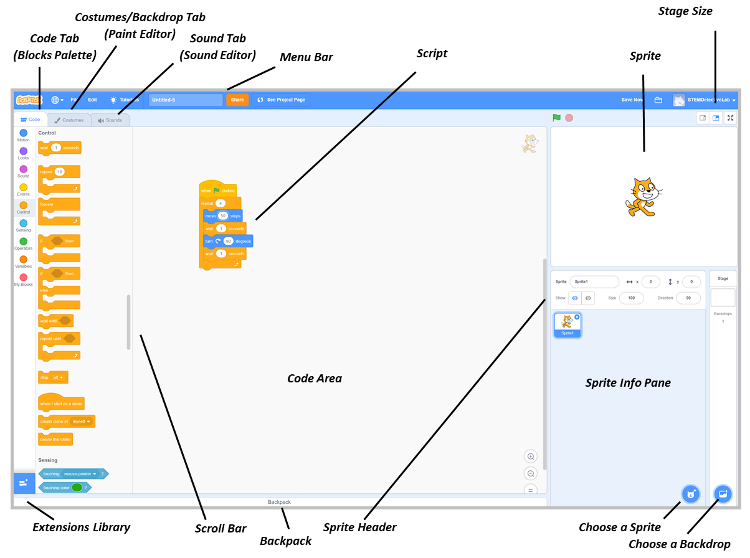
» The Menu Bar supplies you with easy access to commands that you will use while creating your projects.
» The Stage Size switch allows you to toggle between three stage sizes: Small Stage Layout, Regular, and Full Screen.
» The Stage is the background of your project. It can have scripts, backdrops, and sounds like a sprite, but with a few restrictions. For example, the stage does not have motion or size blocks.
Note: The Stage will always be the back layer – No sprites can move behind the stage.
» A Sprite is an object in your project controlled by your scripts. Sprites can be created by you, uploaded from your computer, or found in the Sprite Library.
» The Sprite Info Pane is where you will find a thumbnail for each sprite in your project. When selected, the thumbnail will appear highlighted and its details will show in the Sprite Header located above the list of sprites.
» The Choose a Sprite button is marked with a symbol of a cat’s face, and it’s located at the bottom right corner of the sprite info pane. Slide your mouse pointer over the button to display four Choose a Sprite menu options: Choose a Sprite, Paint, Surprise, and Upload Sprite.
» The Choose a Backdrop button is marked with a symbol of a background image, and it’s located to the right of the Choose a Sprite button. Slide your mouse pointer over the button to display four Choose a Backdrop menu options: Choose a Backdrop, Paint, Surprise, and Upload Backdrop.
» A Script is created by combining a group of interlocking blocks together. The order of the blocks is very important as this is what controls your sprite. Sprites can be controlled by multiple scripts.
» The Code Area, to the left of the Stage and Sprite List, is where you will build your scripts. Right-click in this area to access five Code Area menu options: Undo, Redo, Clean Up Blocks, Add Comment, and Delete Block.
» The Code Tab is the first of three tabs located on the far-left side of the project editor. This tab contains the Block Palette which is where you will find the blocks used to control your sprites.
These blocks are divided into ten categories/subcategories of color-coded blocks. You can either click on one of the Category buttons or use the Scroll Bar to find the block you’re looking for, then drag it to the Code Area to build your scripts.
Block Categories/Subcategories: Motion, Looks, Sound, Events, Control, Sensing, Operators, Variables, Lists, and My Blocks.
Note: The Make a List block is the only list block visible until you make your first list.
» Click on the Add Extension button located at the bottom left corner of the Code Tab to load additional blocks to your projects. These extensions include the Pen, Video Sensing, and Music blocks from Scratch 2.0 as well as hardware and web extensions that allow you to do amazing things with robots and more.
» The Costumes/Backdrop Tab is the middle tab located on the far-left side of the project editor. This tab is where you will find the Paint Editor, which includes a Costume Pane on the left side of the editor. The costume pane contains a thumbnail for each costume of the selected sprite. Click on the thumbnail for the costume you wish to modify in the Paint Editor. The currently selected thumbnail will be highlighted, and its costume is the image that will appear on the editor’s canvas area. Right-click on the highlighted thumbnail for three menu options: duplicate, export, and delete.
There is a Choose a Costume button in the bottom left corner that will look familiar. It’s the same image from the Choose a Sprite button. Slide your mouse pointer over the button to display five Choose a Costume menu options: Choose a Costume, Paint, Surprise, Upload Costume, and Camera.
» The Sounds Tab is the third and final tab located on the far-left side of the project editor. This tab consists of two sections, the Sound List and the Sound Editor. The sound list contains a thumbnail for each sound in your project. The currently selected thumbnail will be highlighted, and the sound will appear in the editor ready to be edited. Right-click on the highlighted thumbnail for three menu options: duplicate, export, and delete.
There is a Choose a Sound button in the bottom left corner of the Sounds tab. Slide your mouse pointer over the button to display four Choose a Sound menu options: Choose a Sound, Record, Surprise, and Upload Sound.
» The Backpack is a long white bar located at the bottom of the editor that will open and close when you click on it with your mouse. With the backpack, you to drag and drop costumes, sprites, sounds, and scripts between sprites and other projects.
Scratch 3.0 Paint Editor
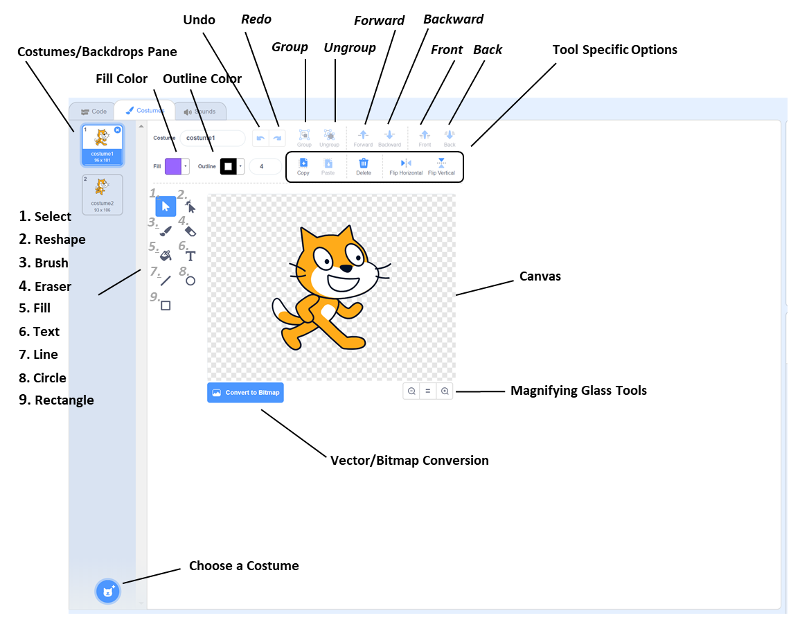
Scratch’s Paint Editor is a built-in image editor you can use to create and modify sprites, costumes, and backdrops. You can create them in either the Vector Editor or the Bitmap Editor.
The tools available for the vector and bitmap formats are slightly different and are described below for reference. The vector editor creates a smoother image and allows you to bend or curve your lines and images. The bitmap editor is easier to use and creates pixel style images. The paint editor opens as a vector editor by default.
Note: If you’ve converted a bitmap image to a vector image, some of the tools listed below will not work as expected.
Common Paint Editor Options
The common Vector and Bitmap options are located above the canvas area.
» The Costumes/Backdrops Pane is the light blue column located along the far-left side of the Costumes/Backdrops tab. This is where you will find thumbnail images for each costume associated with your sprite or each backdrop associated with your stage.
When selected, the thumbnail will appear highlighted and its image will appear in the editor’s canvas area. You can modify the current costume/backdrop, create a new one, or load something from the library.
» The Undo button, located to the right of the costume name, is the arrow curved to the left, and it’s used to remove the last action completed.
» The Redo button, located next to the Undo button, is the arrow curved to the right, and it’s used to add back the last action removed by the undo button.
» The Fill Color drop-down menu, located under the costume name, is used to change colors in the paint editor.
The four smaller buttons, located at the top of the drop-down menu, are the color blending options. Select the first button for a solid color or select one of the other three buttons to blend two colors together to create a gradient effect.
Use the two larger buttons, located just below the four smaller ones, to pick the colors you want to use for the gradient effect. Use the swap arrows to switch the order of the colors.
The three sliders, located beneath the buttons, are used to adjust the color, saturation, and brightness values.
At the bottom left corner of the menu is a button with a red slash through it. Use this button to make something transparent.
At the bottom right corner of the menu is a button with an image of an eyedropper on it. Use this button to select a specific color from anywhere in the editor. Click on the eyedropper, then click on the color you want to use.
» The Tool Specific Options are located to the right of the outline drop-down menu in the vector editor and the fill drop-down menu in the bitmap editor. These options will change depending on which tool, located to the left of the canvas area, is selected.
» The Vector/Bitmap Conversion button allows you to switch between the vector and bitmap editors.
» The Magnifying Glass Tools are located at the bottom right corner of the canvas area. Use the ‘+’ button to zoom in and the ‘-‘ button to zoom out. The ‘=’ button sets the image back to 100%.
Vector Paint Editor Options
The Vector Options are located above the canvas area.
» The vector Group button allows you to group several objects together. This allows you to move the objects all at once.
» The vector Ungroup button allows you to separate objects that were grouped together.
» The vector Forward and Backward buttons allow you to layer an object one layer in front of, or behind, another. You can move an object forward or backward multiple times depending on how many objects you have layered.
» The vector Front and Back buttons allow you to layer an object all the way to the front, or back, in one step.
» The vector Outline Color drop-down menu, located to the right of the fill menu, is used to change an object’s outline color. This menu is very similar to the fill menu with sliders for the color, saturation, and brightness values as well as the two buttons for the transparent and eyedropper options. The difference is that you can’t blend colors to create a gradient effect on an object’s outline.
Vector Paint Editor Tools
The Vector Tools are located to the left of the canvas area.
» The vector Select (Mouse Pointer) Tool is used to stretch, shrink, rotate or change the location of an object. When you select the object, a blue box will appear around it for you to manipulate like the bitmap editor’s select tool.
- The tool-specific options for the select tool are Copy, Paste, Delete, Flip Horizontal, and Flip Vertical.
» The vector Reshape Tool is used to bend or change the shape of an object by grabbing points with the mouse and moving them. Click on the object to see several small circles appear. Click and drag these circles to change the shape of the selected object.
- The tool-specific options for the reshape tool are Curved, Pointed, and Delete.
» The vector Brush Tool is used to draw on the canvas. Select the brush tool, hold down and drag the mouse to draw brush strokes. Select the reshape tool, then click on the brush strokes to see several small circles appear. Click and drag these circles to change the shape of the brush strokes.
- The tool-specific option for the brush tool is Brush Size.
» The vector Eraser Tool is used to delete an area of your image. Adjust the size of the eraser, then click and drag it over the area you want to be deleted.
- The tool-specific option for the eraser tool is Eraser Size.
Note: Unlike the bitmap eraser, this eraser will outline the edges of the section you erased.
» The vector Fill Tool (also known as paint bucket) is used to fill in vector objects with the color specified in the Fill menu, located above the canvas area. If you click on the fill tool, then move your mouse over your sprite, you will see the objects that can be filled with this tool. Just click in the section you want to fill.
Note: Unlike the bitmap fill tool, this fill tool will fill objects only. It doesn’t fill in a whole section like a background.
» The vector Text Tool is used to add text to the canvas area. Click on the text tool, then click the area of the canvas where you would like the text to be located. Once you’ve finished typing, click anywhere outside the text box to have the blue measurement box appear around your text. Use this box to resize or rotate your text and use the arrow keys to move it.
- The tool-specific option for the text tool is a font drop-down menu option.
» The vector Line Tool is used to draw straight lines which can then be altered using the reshape tool. Draw a straight line, select the reshape tool, then click on the line to make two points appear, one at each end. Click anywhere on the line again for additional points. Use these points to bend/curve the line.
» The vector Circle Tool is used to draw circles and ovals. Click on the circle tool, then click on the canvas in the area where you want to draw. Move your mouse away from the starting point while holding the mouse button down and watch your oval take shape. Move the mouse around to see how the oval shape changes.
Hold the shift key while moving the mouse if you want to form a perfect circle.
» The vector Rectangle Tool is used to draw rectangles and squares. Click on the rectangle tool, then click on the canvas in the area where you want to draw. Move your mouse away from the starting point while holding the mouse button down and watch your rectangle take shape. Move the mouse around to see how the rectangle shape changes.
Hold the shift key while moving the mouse if you want to form a perfect square.
Bitmap Paint Editor Tools
The Bitmap Tools are located to the left of the canvas area.
» The bitmap Brush Tool is used to draw in the canvas area. Select the Brush tool, click on the canvas, then drag your mouse while holding the mouse button down.
- The tool-specific option for the brush tool is Brush Size.
» The bitmap Line Tool is used to draw straight lines in the canvas area. Unlike the brush tool, the line tool can draw straight lines only.
- The tool-specific option for the line tool is Line Width.
» The bitmap Circle Tool is used to draw circles and ovals. Click on the circle tool, then click on the canvas in the area where you want to draw. Move your mouse away from the starting point while holding the mouse button down and watch your oval take shape. Move the mouse around to see how the oval shape changes.
Hold the shift key while moving the mouse, if you want to form a perfect circle.
- The tool-specific options for the circle tool are Filled and Outlined.
» The bitmap Rectangle Tool is used to draw rectangles and squares. Click on the rectangle tool, then click on the canvas in the area where you want to draw. Move your mouse away from the starting point while holding the mouse button down and watch your rectangle take shape. Move the mouse around to see how the rectangle shape changes.
Hold the shift key while moving the mouse if you want to form a perfect square.
- The tool-specific options for the circle tool are Filled and Outlined.
» The bitmap Text Tool is used to add text to your costume or backdrop. Click on the text tool, then click the area of the canvas where you would like the text to be located. Once you’ve finished typing, click anywhere outside the text box to access the blue measurement box around your text. Use this box to resize or rotate your text and use the arrow keys to move the it.
» The bitmap Fill Tool is used to fill any closed area of one color with a color specified in the Fill menu located above the canvas area.
» The bitmap Eraser Tool is used to erase a section of your costume or backdrop. Unlike the vector eraser, this eraser doesn’t leave an outline along the edges of the erased sections.
» The bitmap Select (Mouse Pointer) Tool is used to stretch, shrink, rotate or change the location of an object. When you select the object, a blue box will appear around it for you to manipulate like the vector editor’s select tool.
- The tool-specific options for the select tool are Copy, Paste, Delete, Flip Horizontal, and Flip Vertical.
Scratch Blocks
Scratch blocks are color-coded blocks that you connect like puzzle pieces to create scripts. You can use one or more scripts to control your sprites and your stage’s backdrop(s) as you program games, animation, and more.
Block Types
There are six block types, each with a unique shape, that will only connect to blocks that contain a matching slot made for that specific shape. This feature allows kids to learn the logic of programming, without having to worry about syntax errors.
Block Types: Hat Blocks, Stack Blocks, Reporter Blocks, Boolean Blocks, C Blocks, and Cap Blocks.
Hat Blocks
Hat blocks are used to start your scripts. Whether it’s the click of the green flag or the press of a key, hat blocks wait for their specific event to occur before executing the rest of the blocks in the script. These blocks are shaped like a hat, with a rounded top and a bump on the bottom. The bump on the bottom controls which block types you can attach to it.
Scratch currently has 6 hat blocks in the Events Blocks category and one hat block in the Control Blocks category. Hat blocks are also available in 7 of the 11 Scratch Extensions that you can add to your project at this time.

Stack Blocks
Stack blocks are used to perform the main tasks in your scripts. These blocks have a notch at the top, and a bump at the bottom, allowing blocks to connect to the top and bottom of the block. Some stack blocks have an area for you to add input information, and some have drop-down menus with additional choices.
Stack blocks are the most common type of blocks in Scratch. Scratch currently has stack blocks in every block category except for the Operators Blocks. Stack blocks are also available in 8 of the 11 Scratch Extensions that you can add to your project at this time.

Reporter Blocks
Reporter blocks are used to report numeric, string, or Boolean values in your scripts. These blocks are rounded at both ends, with a smooth top and bottom. They don’t connect to other blocks but fit in blocks that require an input value. When you run your script, the reporter block will be executed before the block it’s placed in is executed.
Scratch currently has reporter blocks in each block category except for the Events Blocks and Control Blocks. Reporter blocks are also available in 8 of the 11 Scratch Extensions that you can add to your project at this time.

Boolean Blocks
Boolean blocks are used to pass conditional values in your scripts. These blocks will return a “true” or ”false” value with a string comparison, or a “1” or “0” value with a numeric comparison. Boolean blocks are shaped like an elongated hexagon but will fit in both their corresponding hexagonal slots and some of the rounded reporter slots.
Scratch currently has 13 Boolean blocks – 5 in the Sensing Blocks category, 7 in the Operators Blocks category, and 1 in the List Blocks subcategory. Boolean blocks are also available in 5 of the 11 Scratch Extensions that you can add to your project at this time.

C Blocks
C Blocks are used to perform conditions and loops in your scripts. They’re shaped like a “C”, with the opening sometimes referred to as the mouth of the block, where additional blocks in your script can fit. Except for the forever block, each horizontal arm of a C block has a notch at the top and a bump at the bottom. The forever block is the same as the other C blocks, except that there’s no bump needed at the bottom of the block. Anything below the forever block would never get executed.
Scratch currently has 5 C blocks, all in the Control Blocks category. There are no C blocks available in any of the Scratch Extensions that you can add to your project at this time.

Cap Blocks
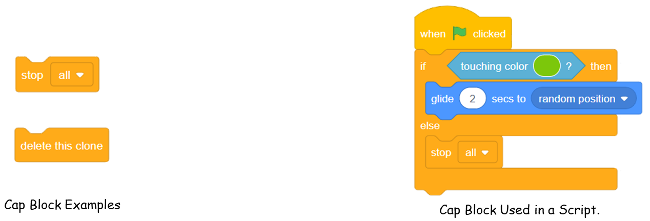
Cap blocks are used to stop your script or project from running. These blocks resemble a stack block with a notch on top, but they were designed without the bump on the bottom. You can’t add any blocks below a cap block. You can, however, place the cap block inside of a C block as shown in the example below. Any code below the C block would not get executed if the else statement is executed, reaching the cap block.
Scratch currently has 2 cap blocks, both in the Control Blocks category. The stop cap block has a drop-down menu with three stop options: stop all, stop this script, and stop other scripts in sprite. If you select the stop other scripts in sprite option, the cap block turns into a stack block.
There are no cap blocks available in any of the Scratch Extensions that you can add to your projects at this time.
Block Categories
The Scratch 3.0 release comes with ten categories/subcategories of Scratch Blocks, and a growing list of Scratch Extensions which you can add to your projects as additional blocks. The Scratch blocks are divided into categories based on their functionality, and each category has its own unique color code.
Block Categories/Subcategories: Motion, Looks, Sound, Events, Control, Sensing, Operators, Variables, List, and My Blocks.
Motion Blocks
Motion blocks are used to control your sprite’s movements. These blocks are not available for your stage’s backdrop(s) because a backdrop can’t move. Motion blocks are medium blue in color and consist of 15 stack blocks and 3 reporter blocks.

Looks Blocks
Looks blocks are used to control the look of your sprites and backdrop(s). These blocks are purple in color and consist of 18 stack blocks and 4 reporter blocks.

Sound Blocks
Sound blocks are used to control the sound and MIDI (Musical Instrument Digital Interface) for your sprites and backdrop(s). These blocks are pink/magenta in color and consist of 8 stack blocks and 1 reporter block.

Events Blocks
Events blocks are used to control the triggering of the scripts for your sprites and backdrop(s). These blocks are yellow in color and consist of 6 hat blocks and 2 stack blocks.
** Every script must start with an Events Block! **
Control Blocks
Control blocks are used to control the execution of your scripts. Whether you want to pause your script, repeat it for a set number of times, loop it forever, or only run it under certain conditions, the control block category is where you need to go. Control blocks are gold in color and consist of 5 C blocks, 3 stack blocks, 2 cap blocks, and 1 hat block.

Sensing Blocks
Sensing blocks are used to detect specific circumstances in your scripts. These blocks can detect touch, keypresses, mouse clicks, and more. Some of the looks blocks allow your sprites to talk, but they don’t have the ability to wait for an answer which is where the ‘ask and wait’ sensing block comes in handy. Sensing blocks are light blue in color and consist of 10 reporter blocks, 5 Boolean blocks, and 3 stack blocks.

Operators Blocks
Operators blocks are used to add math equations and string handling to your scripts. These blocks are light green in color and consist of 11 reporter blocks and 7 Boolean blocks.

Variables & Lists Blocks
There are two subcategories of Variables Blocks – Variables blocks and Lists blocks.
Variables blocks are used to hold and manipulate a numeric value or string stored in a variable that you create. You can create your variable to be useable by all sprites, or just one sprite. Variables blocks are orange in color and consist of 4 stack blocks and 1 reporter block.
Note: Select the checkbox to the left of the variable reporter block to display the current data stored in the variable.

The Lists blocks are used to hold and manipulate lists of numeric values or strings that are stored in a list that you create. You can create your list to be useable by all sprites, or just one sprite. List blocks are red in color and consist of 7 stack blocks, 4 reporter blocks, and 1 Boolean block. The ‘Make a List’ block is the only list block visible until you create your first list.
Note: Select the checkbox to the left of the list reporter block to display the current item stored in the list.
My Blocks
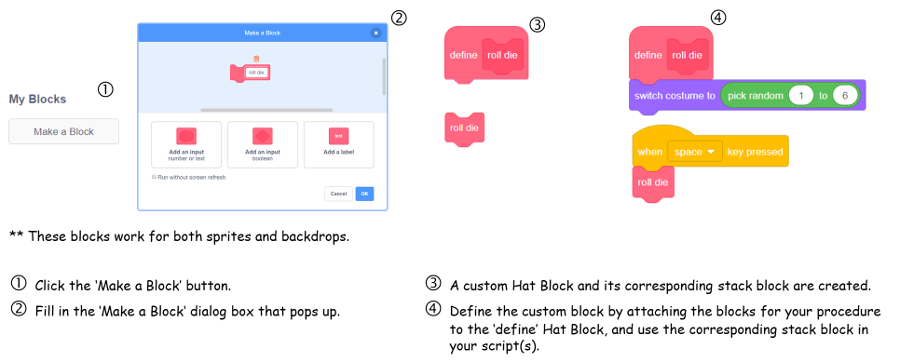
My blocks are used to create custom blocks for your sprites and backdrop(s). If you need the same sequence of blocks in multiple locations, My blocks allow you to define your custom block with this sequence, creating what is known as a procedure. Procedures help you write clean, easy to maintain code. My blocks are pink in color and there is no limit to the number of custom blocks that you can create in this category. Once you create a custom block you will notice that My Blocks consists of a special Hat block to attach your sequence of blocks too, and a stack block to represent your procedure.
Block Extensions
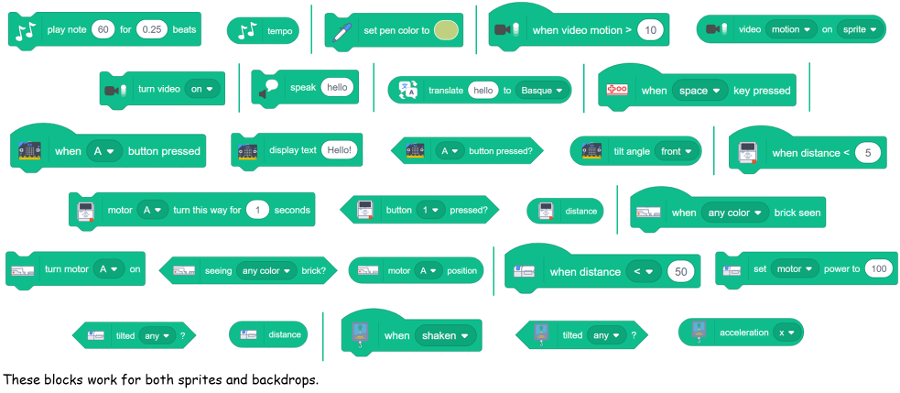
Scratch Block Extensions are used to connect your projects with external hardware, web information, and additional blocks that will give your project extra functionality. Select the ‘Add Extension’ button at the bottom left corner of the Scratch Editor to access the Extensions Page. Click on the extension you’d like to add to your project, and the corresponding blocks will appear in the block palette as an additional block category.
Scratch has 11 extensions to choose from at this time – Music, Pen, Video Sensing, Text to Speech, Translate, Makey Makey, micro:bit, LEGO Mindstorms EV3, LEGO Boost, LEGO Education WeDo 2.0, and Go Direct Force & Acceleration. You may recognize a few of them – the Music, Pen, and Video Sensing blocks were available in the Scratch 2.0 Music, Sound, and Sensing categories.
These blocks are darker green in color, and each extension category consists of a unique set of block types, as shown below.
