Project 1 – Change the Color of Your Sprite
Project 2 – Change the Color of Multiple Sprites
Project 3 – Make Your Sprite Talk
Project 4 – Change the Size of Your Sprite
Project 5 – An Events Blocks and Looks Blocks Mini Animation
Scratch in a Nutshell
Scratch is a free graphical programming language and online community created by the MIT Media Lab. It was designed to help kids like you learn how to program visually with blocks that snap together to create a group of instructions, known as scripts. These scripts control objects, known as sprites, in your projects.
The Scratch online community has MILLIONS of shared projects from around the world. Visit the Scratch website at https://scratch.mit.edu to create a Scratch account, check out some amazing projects shared by others in the Scratch community, and use the Scratch online project editor to create amazing projects of your own. You can also download the Scratch Desktop software to use when you don’t have access to the internet.
Getting Started
If you’re new to Scratch, we recommend you check out our Scratch Coding Camp – Introduction to Scratch 3.0 Badge tutorial. Our Introduction to Scratch is full of useful information to help you familiarize yourself with Scratch, its editors, and more.
The Scratch 3.0 release comes with ten categories/subcategories of Scratch blocks plus a growing list of Scratch Extensions which you can add to your projects as needed. The Scratch blocks are divided into categories based on their functionality, and each category has its own unique color code.
Our Animal Antics tutorial will cover blocks from the yellow Events blocks and the purple Looks blocks categories. As you work your way through this tutorial, you will gain the experience needed to confidently create and modify sprites and their corresponding scripts. It won’t be long before you’re ready to code your own games, animation, and more.
Events Blocks
The Events Blocks category contains eight blocks – six Hat blocks and two Stack blocks. Every script needs to start with a Hat block as it will sense when a specific event has occurred, triggering the script to run.

Looks Blocks
The Looks Blocks category contains twenty blocks you can use to change the appearance of your sprites and background images.

Project 1 – Change the Color of Your Sprite
We’re going to walk you through this first project step by step while you get comfortable with how scripts are built. The next few projects will have fewer directions, but don’t worry – You’ll have more fun with less help. The last project covers multiple topics, so you’ll notice additional directions as needed.
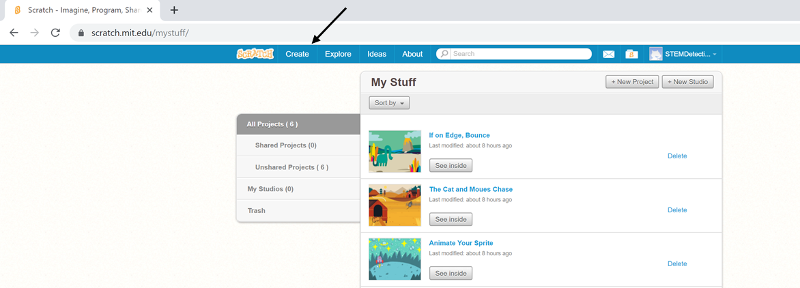
1.) If you haven’t already done so, bring up your web browser and go to https://scratch.mit.edu/. If you want to save and/or share your projects, be sure to create an account and sign in.
2.) Select Create from Scratch’s top navigation bar to access the Scratch user interface, also known as the project editor.
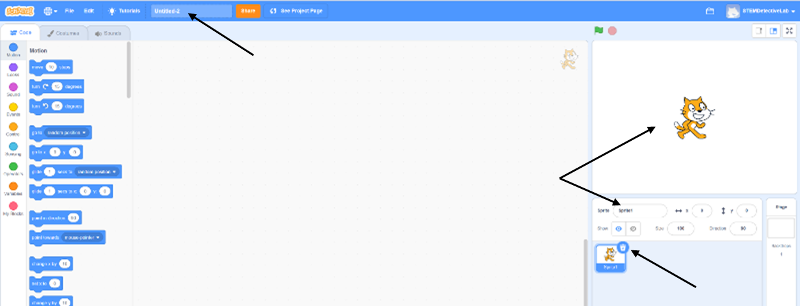 3.) The editor will start with a new default project that consists of the default Scratch sprite, labeled Sprite1, and a default name of Untitled-xx.
4.) Change the name of your project to something meaningful, so you can locate it again later if needed.
5.) Locate the Sprite List on the right-hand side of the editor, below the Stage, where you should see the thumbnail for the Scratch sprite. Delete the Scratch sprite by right-clicking on the thumbnail and selecting Delete or clicking on the ‘x’ at the top right corner of the box.
Note: When you have multiple sprites, the currently selected thumbnail will have a blue border around it, not gray.
![]()
6.) It’s time to choose an animal sprite for your project. Move your mouse cursor over the Choose a Sprite button, located at the bottom right corner of the editor, to expand the button for the four menu options available at this time – Choose a Sprite, Paint, Surprise, and Upload Sprite. Click on Choose a Sprite to access the Sprite Library.
![]()
7.) Type the word animal in the search bar located at the top left corner of the Sprite Library and hit enter. This should filter out the non-animal sprites, so you can see the animal sprites only.
8.) Choose your favorite animal sprite, but don’t worry about choosing one that has additional costumes. You won’t need to work with extra costumes for this exercise.
9.) You’re now ready to program your script to change the color of your animal sprite.
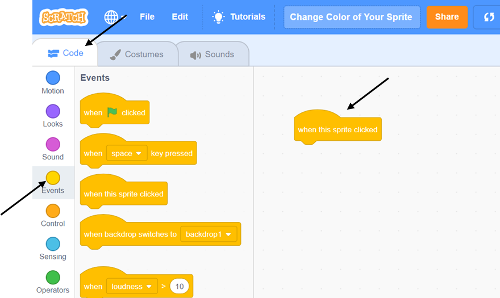 10.) There are three tabs located on the left-hand side of the project editor, just below the top menu bar. We’re only interested in the Code Tab, for now, so make sure it’s currently selected. We’ll use the Costumes Tab and Sounds Tab another time.
11.) You should see two columns that deal with blocks under the Code Tab. The first column contains nine colored circles that represent a corresponding block category, and the second column contains all blocks within that category.
12.) Click on the yellow circle labeled Events to access the Events Blocks category.
13.) Drag the ‘when this sprite clicked’ Hat block from the Blocks Palette to the Code Area. Remember, all scripts need to start with a Hat Block from the Events Blocks category.
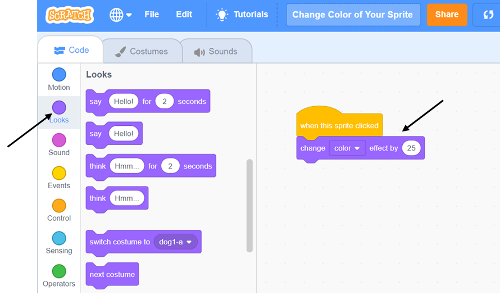 14.) Now you need your script to tell the new sprite to change its color. The ‘change color’ block is in the purple Looks Blocks category.
15.) Click on the purple circle labeled Looks, then drag the ‘change (color) effect by (25)’ block to the Code Area and connect it to the bottom of the ‘when this sprite clicked’ Hat block from Step 12.
16.) Now click on your sprite. What happens? You should see your animal sprite change color each time you click the sprite with your mouse.
17.) Your sprite and its script should look like this:
![]()
Challenge: Play around with the different effects from the ‘change color effect’ drop-down menu.
Note: If you take a closer look at the ‘change color effect by 25’ block, you will see a drop-down menu next to the word color. Click on the arrow to see the additional effect options you can choose from.
Project 2 – Change the Color of Multiple Sprites
Make the following changes to the script from Project 1:
![]() 1.) Swap the ‘when this sprite clicked’ Hat block with the ‘when (space) key pressed’ Hat block.
1.) Swap the ‘when this sprite clicked’ Hat block with the ‘when (space) key pressed’ Hat block.
2.) Right-click on your animal sprite and select duplicate to create a copy of your original sprite.
Note: Look at the script for both sprites. Notice that not only did the sprite get duplicated, but all scripts associated with it did too.
3.) Click on the space bar. You should see both of your sprites change color.
4.) The two sprites and their scripts should look like this:
![]()
Challenge: Use the ‘when key pressed’ drop-down menu to change the color of your sprite using different key presses.
Project 3 – Make Your Sprite Talk
1.) Select ‘File -> New’ from the top menu bar and rename the project to something more meaningful than unknown-xx.
2.) You can use the default Scratch sprite (Scratch is an animal after all) or choose another animal sprite from the Sprite Library.
3.) Remember, all scripts need to start with a Hat block. Click on the Events Blocks category, then drag the ‘when this sprite clicked’ Hat block to the Code Area.
4.) Next, you need to make your sprite talk. There are several talking blocks in the Looks Blocks category. Drag the ‘say (Hello!) for (2) seconds’ block to the Code Area and connect it to the bottom of the Events Hat block from the previous step.
5.) Now click on your sprite. What happens? You should see a speech bubble appear next to your animal sprite with the phrase “Hello!” for two seconds before it disappears.
6.) Play around with the different methods of having your sprite talk. You can change how long the speech bubble is visible or have it stay forever.
7.) Your sprite and its script should look like this:
![]()
Challenge: Have two animal sprites talk to each other.
Project 4 – Change the Size of Your Sprite
So far, you’ve only needed to program one script to control your animal sprite, but sprites can have multiple scripts, each one with its own task. This project will have you use two scripts, one to make your sprite bigger and one to make it smaller.
1.) Select ‘File -> New’ from the top menu bar and rename the project to something more meaningful than unknown-xx.
2.) You can use the default Scratch sprite or choose another animal sprite from the Sprite Library.
3.) Click on the Events Blocks category, then drag the ‘when (space) key pressed’ Hat block to the Code Area.
4.) Use the drop-down menu to switch the ‘when (space) key pressed’ block to ‘when (up arrow) key pressed’.
5.) There are two blocks in the Looks Blocks category that will change the size of your sprite. You’re going to use the ‘change size by (10)’ block so drag it to the Code Area and connect it to the bottom of your Hat block.
6.) Now we’re going to show you a time-saving trick. Right-click on the script you just finished programming and select the Duplicate option.
Note: The duplicate feature will only duplicate the block you clicked on and any blocks below it. Any blocks above the block you clicked on will not be duplicated.
7.) The duplicate script is created on top of the original, so you won’t see it until you move your mouse cursor. Drag and drop the duplicate script next to the original one.
8.) Modify the new script by changing the Hat block’s drop-down menu from ‘when (up arrow) key pressed’ to ‘when (down arrow) key pressed’.
9.) Change the value in the ‘change size by (10)’ block to ‘change size by (-10)’.
10.) Now run your script. Your sprite should grow bigger each time you press the up arrow key, and it should shrink in size each time you press the down arrow key.
11.) If you run into trouble, your sprite and its two scripts should look something like this:
![]()
Challenge: Can you make your animal sprite change color each time it changes size?
Project 5 – An Events Blocks and Looks Blocks Mini Animation
In Project 4, you learned that you can have multiple scripts for a single sprite. You can also have the scripts from one sprite interact with scripts from another, which you will be doing more often as your programs become more complicated.
This last Animal Antics project is going to cover several topics in order to help you take your programming skills to the next level. Our mini animation will show you how to hide sprites until they’re needed, how to switch backdrops, how to watch for the backdrop change event, and how to broadcast and receive messages.
1.) Select ‘File -> New’ from the top menu bar and rename the project to Mini Animation.
2.) Up until now, you’ve only used the white, default backdrop for your Stage. Like a sprite’s ability to have multiple costumes, the Stage can have multiple backdrops. And like costumes, backdrops can be edited.
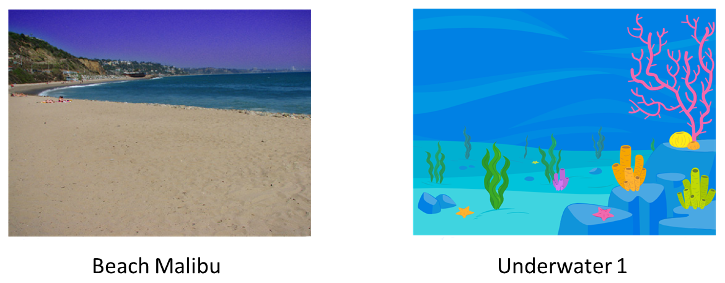
3.) We used two backdrops for our Mini Animation – Beach Malibu & Underwater 1 (see above images).
4.) Move your mouse cursor over the Choose a Backdrop button, located to the right of the Choose a Sprite button, to expand the button for the four menu options available at this time – Choose a Backdrop, Paint, Surprise, and Upload Backdrop. Click on Choose a Backdrop to access the Backdrop Library.
5.) Type Beach Malibu in the search bar, then click on the image so it will load into your project. You will notice a small thumbnail image of your backdrop on the far-right side of the project editor, under the Stage label.
6.) Move your mouse cursor over the Choose a Backdrop button again, search for Underwater 1, then click on that image to load it into your project. Notice that the backdrop thumbnail under the Stage label is now an image of the Underwater 1 backdrop you just selected. This thumbnail will always be the image of the last backdrop loaded into your project. To see all backdrops loaded into your project click on the Backdrops Tab which is located where you’re used to seeing the Costumes Tab.
Note: The Costumes Tab is visible when one of the sprite thumbnails in the Sprite List is highlighted, but it will switch to the Backdrop Tab if you click anywhere in the Stage Pane – the area below the Stage label where you can see the latest Backdrop thumbnail.
![]()
7.) We used three sprites in our Mini Animation – the Starfish, Octopus, and Jellyfish (see above images).
8.) Move your mouse cursor over the Choose a Sprite button, located at the bottom right corner of the editor, and click on Choose a Sprite to access the Sprite Library.
9.) Type the word ocean in the search bar located at the top left corner of the Sprite Library and hit enter. You should now see the sprites that are related to the ocean. We used the Starfish, Octopus, and Jellyfish but feel free to use any of the ocean sprites you see from your search. Click on one of the sprites, then repeat these steps for the other two sprites.
Stage:
1.) If you haven’t already loaded the Beach Malibu and Underwater 1 backdrops for your stage yet, do that now.
2.) The animation will start at the beach, so add the following Script to the Code tab of your Stage’s code area:

Note: Each time you start a Scratch program, the Stage’s backdrop and any sprites in your program will start where they left off from the previous run.
If we didn’t add the ‘switch backdrop to Beach Malibu’ looks block at the start of our animation, the Underwater 1 backdrop would be visible because it was the backdrop visible at the end of the previous run.
Starfish:
The Starfish sprite is the first sprite to make an appearance in your mini animation. He starts on the beach, talks to you for a moment, then heads to the ocean to look for his friends.
1.) Remember, your Stage will set its backdrop to the Beach Malibu backdrop when the user clicks the green flag. You will need the Starfish script to start with the same ‘when green flag clicked’ Hat block.
2.) Next, have the Starfish talk to the user as if he/she is right there on the beach. We used three ‘say (Hello!) For (2) seconds’ blocks from the Looks Block category, one for each sentence. Feel free to change the conversation and play with the wait times as needed. Personalize your mini animation, you’ll have more fun and the experimenting will improve your programming skills.
3.) Once your Starfish has finished talking, use the ‘switch backdrop’ block to switch the backdrop from Beach Malibu to Underwater 1.
4.) Now add two more ‘say (Hello!) for (2) seconds’ blocks, fill in the wording and time values (in seconds) from our script below.
Note: You may be wondering if we forgot to add a conversation to our ‘say (Hello!) for (2) seconds’ block near the bottom of our script. This is our sneaky way of having our starfish pause for a second before he talks to his friends.
There is a ‘wait (1) second’ block we can use once we cover the Control Blocks category in a future tutorial.
5.) The last step with the Starfish script is to let the other two sprites know that it’s their turn to talk. Add the ‘broadcast message1’ Event block to the script, select ‘New message’ from the dropdown menu, and give your message a meaningful name.
Your Starfish’s script should look something like ours below:
![]()
Octopus:
The Octopus sprite will be hiding in the ocean with the Jellyfish sprite until the Starfish sprite shows up, then they’ll both say “hi” to their friend. You will use the ‘hide’ and ‘show’ Looks blocks and the ‘when I receive message’ Events block to do this.
1.) You need to start the Octopus’ first script with the same ‘when green flag clicked’ Hat block used by the Stage and the Starfish. This will make sure everything starts at the same time.
2.) Attach the ‘hide’ block from the Looks Blocks category to the ‘when green flag clicked’ Hat block and that’s it. When the user clicks the green flag to start your mini animation, the Octopus will hide, and this script will be done.
3.) You will start the Octopus’ second script with the ‘when backdrop switches’ Hat block from the Events Blocks category. Use the drop-down menu to select the backdrop you want to switch to.
4.) Attach the ‘show’ block from the Looks Blocks category so the Octopus will be visible as soon as the scene changes from the beach to the underwater scene.
5.) Start the Octopus’ third script with the ‘When I receive message’ Hat block and use the dropdown menu to select the message you broadcasted earlier in the Starfish script.
6.) Now attach the ‘say (Hello!) for 2 seconds’ block from the Looks Blocks category, switch the message to say ‘Hi Sid!‘ and you’re done with the Octopus’ scripts.
Note: Feel free to change the conversation at any time.
![]()
Jellyfish:
Like the Octopus sprite, the Jellyfish sprite needs to be hidden until the Starfish finds them. The scripts for the Octopus and the Jellyfish are the same, so you can either create two more scripts to match the ones in the above image, or you can use the following steps to use Scratch’s Backpack feature.
The Backpack feature allows you to drag and drop sprites, scripts, costumes, and more into the backpack to be used in another project, or with another script within the same project.
1.) Click on the Octopus sprite so the scripts you just programmed are visible.
2.) Next, click on the white Backpack bar, located at the bottom of the project editor, to expand the backpack. Click on the Backpack tag again when you want to close this section.
3.) One at a time, click on the Hat block of each of the three scripts, drag them to the backpack, and drop them once you see the light blue backgrounds switch to dark blue. Once you’re done, you should see a copy of the three scripts inside the backpack, with the originals still in the project area.
Note: You need to make sure you click on the Hat block. The backpack feature will only copy from the block you selected and anything below it.
4.) Click on the Jellyfish sprite so you can drag and drop these scripts from the backpack to the Jellyfish code area.
5.) One at a time, click on each of the three scripts in the backpack, drag them to the code area and drop them once you see the background color change to dark blue. If done correctly, you should still see the three scripts in the backpack area and their duplicates in the Jellyfish code area.
6.) Now click on the green flag and watch your first mini animation.
Challenge: Make a copy of this animation (click on the File menu bar option and select ‘Save as a copy’). Modify the copy, so the three ocean friends continue to talk to each other before the starfish heads back to the beach.
