Scratch in a Nutshell
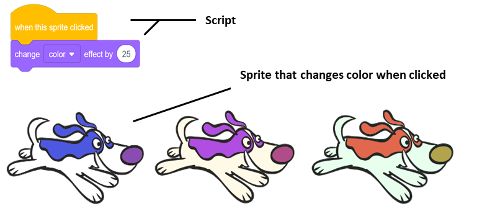 Scratch is a free graphical programming language and online community created by the MIT Media Lab. It was designed to help kids like you learn how to program visually with blocks that snap together to create a group of instructions, known as scripts. These scripts control objects, known as sprites, in your projects.
The Scratch online community has MILLIONS of shared projects from around the world. Visit the Scratch website at https://scratch.mit.edu to create a Scratch account, check out some amazing projects shared by others in the Scratch community, and use the Scratch online project editor to create amazing projects of your own. You can also download the Scratch Desktop software to use when you don’t have access to the internet.
Getting Started
If you’re new to Scratch, we recommend you check out our Scratch Coding Camp – Introduction to Scratch 3.0 Badge and our Scratch Coding Camp – Animal Antics Badge.
Our Introduction to Scratch is full of useful information to help you familiarize yourself with Scratch, its editors, and more. Our Animal Antics badge will help you understand how to start your scripts and how to change the appearance of your sprites. Our camp badge tutorials are designed to progress in difficulty level, so many beginners find it easier to enjoy our Scratch Coding Camp tutorials in the order shown.
The Scratch 3.0 release comes with ten categories/subcategories of Scratch blocks plus a growing list of Scratch Extensions which you can add to your projects as needed. The Scratch blocks are divided into categories based on their functionality, and each category has its own unique color code.
Our Runners Take Your Mark tutorial is all about controlling your sprites, and how you can move them around. This tutorial will introduce you to the medium blue Motion blocks, the gold Control blocks, and the light blue Sensing blocks. As you work your way through this tutorial, you will gain the experience needed to confidently create scripts that control and move your sprites, helping you get one step closer to coding your own games, animation, and more.
Motion Blocks
Motion blocks are used to control your sprite’s movements. These blocks are not available for your stage’s backdrop(s) because a backdrop can’t move. With Motion blocks, you can bring life to your sprites. You can make your sprites move forward & backward or up & down, you can make the cat sprite follow the mouse pointer or have the pencil sprite draw some amazing artwork.
There are 18 different Motion blocks that you will have fun with as you learn to move your sprites around the stage area. There are 15 Stack blocks that you can use to control your sprite’s movement and 3 Reporter blocks that you can use when using its position in a script.

Control Blocks
Control blocks are used to control the execution of your scripts. Whether you want to pause your script, repeat it for a set number of times, loop it forever, or only run it under certain conditions, the Control block category is where you need to go.
There are 11 different Control blocks that you can use to take control of your sprites. You can choose from 5 Stack blocks, 3 C blocks, 2 Cap blocks, or the one Hat block that isn’t an Event block.

Sensing Blocks
Sensing blocks are used to detect specific circumstances in your scripts. These blocks can detect touch, keypresses, mouse clicks, and more. Some of the Looks blocks allow your sprites to talk, but they don’t have the ability to wait for an answer which is where the ‘ask and wait’ Sensing block comes in handy.
There are 18 Sensing blocks that you can use in your scripts. You can choose from 10 reporter blocks, 5 Boolean blocks, and 3 stack blocks.

If on Edge, Bounce Project
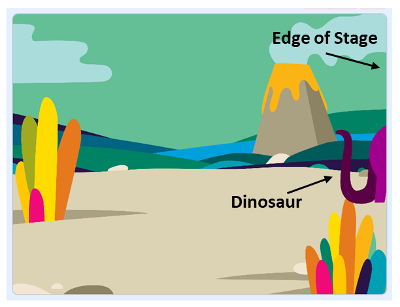
As you can see in the above picture, our dinosaur sprite needs your help. He’s stuck at the edge of the stage and needs help turning around so he can continue his journey. The scripts below show two of the more common problems we’ve seen kids run into when they’re first learning how to program in Scratch. We’ll walk you through these scripts, explaining what’s wrong with each of them, before helping you create a working script of your own.

Problem 1
As soon as you click the space bar on the keyboard, the ‘when (space) key pressed‘ Hat block will be activated, and the dinosaur sprite will move 10 steps. But that’s it. There are no additional instructions for the dinosaur sprite to follow, so he stops moving.
Solution 1
The ‘move (…) steps‘ Motion block needs to be inside a loop to keep the dinosaur sprite walking. We chose the ‘forever‘ block, but you can also use the ‘repeat (…)‘ or ‘repeat until (…)‘ Control blocks as well.
Problem 2
The next movement issue that kids run into quite a bit is shown in the Problem 2 script above. Once this script is activated by the press of the space key, the ‘move (…) steps‘ block is executed continuously, but the dinosaur sprite needs to be told what to do once it reaches the edge of the stage.
Solution 2
This problem points out a very important concept in programming. Every step must be included in your script(s). Imagine you’re controlling a robot with a remote control device. As you have your robot walk forward, what do you do when it reaches the wall? You use your remote control to make it turn around and walk back to you. It’s the same idea with your scripts. Your sprites can only do what you tell them to do. The block we’re going to recommend you use to help the dinosaur turn around and continue walking is the ‘if on edge, bounce‘ Motion block.
If on Edge, Bounce Script
You’ll need to start a new project and decide whether you’d like to use the same backdrop and sprite that we used or pick something out yourself from the Scratch libraries. We used the Jurassic backdrop and the green dinosaur sprite. We changed the dinosaur color to purple so it would be more visible. Once you have that setup, you’re ready to program the following script for your sprite:
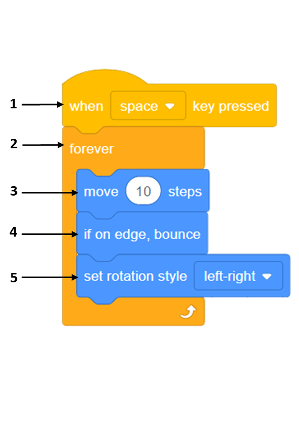
1. Drag and drop an Events block into the code area. We chose to use the ‘when (space) key pressed‘ block but feel free to use a different Hat block if you prefer.
2. We want you to see the dinosaur sprite move back and forth nonstop for this project, so drag and drop the ‘forever‘ Control block into the code area and attach it to the bottom of your Hat block.
3. Drag and drop the ‘move (…) steps‘ Motion block into the code area and attach it to the inside of the ‘forever‘ block. If you look carefully, you’ll notice that the bottom of the ‘forever‘ block is flat. This is to prevent you from attaching any blocks after the ‘forever‘ loop since they would never get activated.
4. You may have noticed that you just created the script from Problem 2. That’s because that script was very close to being correct. Drag and drop the ‘if on edge, bounce‘ Motion block into the code area and attach it to the bottom of the ‘move (…) steps‘ block.
If you press the space key now to test your script, you’ll notice that your dinosaur’s movement isn’t quite right yet. Each sprite has what is known in Scratch as a rotation style. The rotation style block allows you to choose from three options: left-right, don’t rotate, and all around. The default rotation style is set to all around.
5. Drag and drop the ‘set rotation style (…)‘ Motion block to the code area and connect it to the bottom of the ‘if on edge, bounce‘ block. Set the style to left-right and then you’re done. Press the space key to activate your script and watch your sprite move back and forth across the stage area.
Move Blocks vs Glide Blocks Project
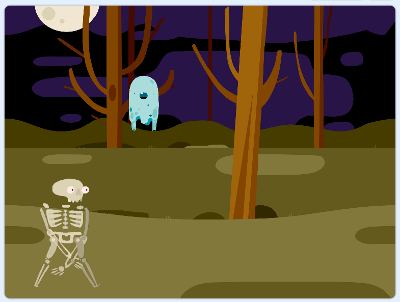
Our first project, If on Edge, Bounce, made use of Scratch’s ‘move (…) steps‘ and ‘if on edge, bounce‘ Motion blocks. Another way to bring life to a sprite is to use Scratch’s ‘glide‘ Motion blocks. But which method should you use with your sprite? Should you have your sprite move or should you make it glide? That depends on what you want your sprite to do, but the information below should help you choose the method that’s right for your situation.
Move Blocks
» Move blocks are Motion blocks that will move a sprite forward by a user-specified number of steps.
Note: You can control the direction a move block takes your sprite by first changing the direction it’s facing with the ‘point in direction (…)‘ Motion block.
» Each step specified in a move block is 1 pixel in length.
» Move blocks can be combined with the ‘if on edge, bounce‘ Motion block to turn your sprite around if the specified number of steps takes your sprite to the edge of the Stage.
Glide Blocks
» Glide blocks move with more precision than move blocks because they move a sprite over a user-specified amount of time, not by a number of steps.
» The ‘if on edge, bounce‘ Motion block doesn’t work with glide blocks, only move blocks.
» Glide blocks will pause your script until your sprite has finished gliding.
Note: You should use a second script to perform any actions you want your sprite to do while gliding.
» Glide blocks can only be interrupted by the ‘stop‘ Control block.
We gave this project a spooky Halloween feel in order to show you the range of options available in the Scratch Libraries. Create a new project and decide for yourself which sprites you’d like to use. You can also add a backdrop, but it’s not necessary for this project. We used the Ghost and Skeleton sprites from the Sprite Library and the Woods backdrop from the Backdrop Library.
The Skeleton sprite contains two scripts that will move the sprite back and forth across the bottom of the stage. The script that is activated with the up arrow key will move the Skeleton back and forth across the bottom of the Stage using the move Motion block. The script that is activated with the down arrow key will move the Skeleton in the same pattern, but it uses the glide Motion block instead.
The Ghost sprite contains two scripts that will make the ghost follow the skeleton back and forth across the bottom of the stage. The script that is activated with the up arrow key will move the Ghost using the move Motion block. The script that is activated with the down arrow key will move the Ghost in the same pattern, but it uses the glide Motion block instead.
Note: We kept the following scripts very ‘bare bones’ (all puns intended), so you can compare the two methods of movement more easily.
Skeleton Sprite’s Move Block Script
The Skeleton sprite’s move block script should look familiar. It’s very similar to the script you just created as you learned about the ‘if on edge, bounce‘ script.
![]() 1. Drag and drop the ‘when (…) key pressed‘ Events block into the code area and use the drop-down menu to select the up arrow key option.
1. Drag and drop the ‘when (…) key pressed‘ Events block into the code area and use the drop-down menu to select the up arrow key option.
2. We added the ‘go to x: (…) y: (…)‘ Motion block next, so our Skeleton sprite will start in the same spot each time the script is run. Setting up your sprite’s position at the start of the script is a good habit to get into.
Before adding the ‘go to x: (…) y: (…)‘ Motion block to the code area, move the Skeleton sprite all the way over to the bottom left corner while the Motion blocks are visible in the Block Palette. You should notice the x and y values in the ‘go to x: (…) y: (…)‘ update with the Skeleton’s new location.
Note: If you seem to be having trouble moving the Skeleton sprite, make sure that your mouse pointer is clicking on one of the bones. The Skeleton won’t move if the mouse pointer is clicked between the bones.
Drag and drop the ‘go to x: (…) y: (…)‘ Motion block with the new x and y values into the code area and attach it to the bottom of the ‘when (up arrow) key pressed‘ block.
3. Drag and drop the ‘forever‘ Control block into the code area and attach it to the bottom of the ‘go to x: (…) y: (…)‘ block.
4. Drag and drop the ‘move (…) steps‘ Motion block into the code area and attach it to the inside of the ‘forever‘ block.
5. Drag and drop the ‘if on edge, bounce‘ Motion block into the code area and attach it to the bottom of the ‘move (…) steps‘ block.
6. Drag and drop the ‘set rotation style (…)‘ Motion block into the code area and connect it to the bottom of the ‘if on edge, bounce‘ block. Set the style to left-right and then you’re done. Activate your script to see that the skeleton is moving back and forth across the stage area.
Skeleton Sprite’s Glide Block Script
This second skeleton sprite script was designed to move the sprite back and forth across the stage just like the previous script, but with the use of ‘glide‘ blocks instead.
![]()
1. Drag and drop the ‘when (…) key pressed‘ Events block into the code area and use the drop-down menu to select the down arrow key option.
Note: We switched to the down arrow key option this time so the two skeleton scripts can be tested separately.
2. Drag and drop the ‘go to x: (…) y: (…)‘ Motion block into the code area and attach it to the bottom of the ‘when (down arrow) key pressed‘ block. Add the x and y values used in the above Skeleton script, so each script starts the skeleton sprite at the same location.
3. Drag and drop the ‘forever‘ Control block into the code area and attach it to the bottom of the ‘go to x: (…) y: (…)‘ block.
4. Drag and drop the ‘point in direction (…)‘ Motion block into the code area and attach it to the inside of the ‘forever‘ block. Keep the default value of 90 so the skeleton is looking the same direction he’s gliding.
5. Drag and drop the ‘glide (…) secs to x: (…) y: (…)‘ Motion block into the code area and attach it to the bottom of the ‘point in direction (…)‘ block. We used 3 seconds for our glide time, switched our x value from negative to positive, and kept our y value the same.
6. Drag and drop the ‘point in direction (…)‘ Motion block into the code area and attach it to the bottom of the ‘glide (…) secs to x: (…) y: (…)‘ block. Set the value to -90 so the skeleton turns around as he glides back to the left of the stage.
7. Drag and drop the ‘glide (…) secs to x: (…) y: (…)‘ Motion block into the code area and attach it to the bottom of the ‘point in direction (…)‘ block. We used 3 seconds for our glide time again, switched our x value back to negative, and kept our y value the same.
Ghost Sprite’s Move Block Script
The Ghost sprite’s move block script uses a new Motion block, the ‘point towards (…)’ block (The drop-down menu options also include the mouse pointer). This block will make following the Skeleton sprite quick and easy.
![]()
1. Drag and drop the ‘when (…) key pressed‘ Events block into the code area and use the drop-down menu to select the up arrow key option.
2. We added the ‘go to x: (…) y: (…)‘ Motion block next, so our Ghost sprite will start at the same spot each time the script is run.
Before adding the ‘go to x: (…) y: (…)‘ Motion block to the code area, move the Ghost sprite somewhere up in the trees where it can hover over the Skeleton. You should notice that the x and y values updated to the Ghost’s current position.
Drag and drop the ‘go to x: (…) y: (…)‘ Motion block with the updated x and y values into the code area and attach it to the bottom of the ‘when (up arrow) key pressed‘ block.
3. Drag and drop the ‘forever‘ Control block into the code area and attach it to the bottom of the ‘go to x: (…) y: (…)‘ block.
4. Drag and drop the ‘point towards (…)‘ Motion block into the code area and attach it to the inside of the ‘forever‘ block. Use the drop-down menu to choose the Skeleton option.
5. Drag and drop the ‘move (…) steps‘ Motion block into the code area and switch the number of steps to 3.
Ghost Sprite’s Glide Block Script
This second Ghost sprite script was designed to move the Ghost in the same following pattern as the previous Ghost script, but with the use of a ‘glide‘ block instead.
![]()
1. Drag and drop the ‘when (…) key pressed‘ Events block into the code area and use the drop-down menu to select the down arrow key option.
2. Drag and drop the ‘go to x: (…) y: (…)‘ Motion block into the code area and attach it to the bottom of the ‘when (down arrow) key pressed‘ block. Add the x and y values used in the previous Ghost script, so each script starts the Ghost sprite at the same location.
3. Drag and drop the ‘forever‘ Control block into the code area and attach it to the bottom of the ‘go to x: (…) y: (…)‘ block.
4. Drag and drop the ‘glide (…) secs to ( )‘ Motion block into the code area and attach it to the inside of the ‘forever‘ block. Feel free to play around with the number of seconds you’d like the Ghost to take to glide towards the Skeleton.
The Cat and Mouse Chase Project
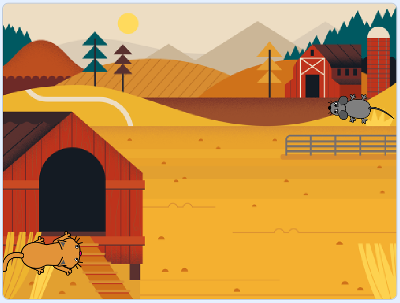
In our third project, the orange tabby cat (hidden in the bottom left corner of the Stage) will chase our poor gray mouse around the barnyard as we guide the frightened little critter with our mouse pointer. As we continue to use Control blocks and Motion blocks in our third project, our Cat and Mouse Chase will also introduce you to the Sensing block category.
You’ll need to start a new project and decide whether you’d like to use the same backdrop and sprites that we used, or if you’d like to come up with your own setup. The above image shows our setup, using the Farm backdrop, the Mouse 1 sprite, and the Cat 2 sprite. Once you have your backdrop and sprites picked out, you’ll be ready to program the following scripts:
Mouse Sprite’s Script
If you look at the script for our Mouse sprite below, you’ll notice that we’re using the ‘if (…) then‘ Control block for the first time. This block allows you to test for a certain condition by filling in the empty slot located between the words ‘if’ and ‘then’. This slot will hold a Boolean block, in our case the ‘mouse down?‘ block. If the mouse button is pressed down, then the two Motion blocks placed inside the ‘if (…) then‘ block will be activated, otherwise, those blocks will be ignored for now. Since this check is inside of the ‘forever‘ Control block, the script will continually check if the mouse pointer is pressed down until the script is stopped.
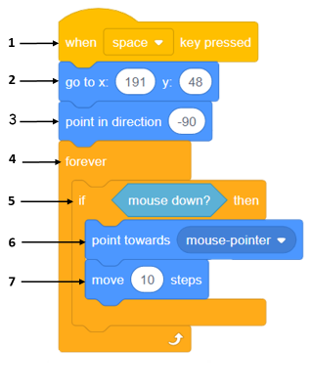
1. Drag and drop the ‘when (…) key pressed‘ Events block into the code area and keep the default space key option.
2. Drag and drop the ‘go to x: (…) y: (…)‘ Motion block into the code area and attach it to the bottom of the ‘when (space) key pressed‘ block. Fill in the x and y values to match the script on your left. You can change the location of the Mouse sprite, but we recommend that you have it as far away from the Cat sprite as possible at the start of the chase.
3. Drag and drop the ‘point in direction (…)‘ Motion block into the code area and fill it in with a value of -90 so that your Mouse sprite faces towards the cat at the start of the chase. Feel free to change this value if you’d like your sprite to face a different direction.
4. Drag and drop the ‘forever‘ Control block into the code area and attach it to the bottom of the ‘point in direction (…)‘ block.
5. Drag and drop the ‘if (…) then‘ Control block into the code area and attach it to the inside of the ‘forever‘ block.
6. Drag and drop the ‘mouse down?‘ Sensing block into the code area and attach it inside the empty slot of the ‘if (…) then‘ block.
7. Drag and drop the ‘point towards (…)‘ Motion block into the code area and attach it to the inside of the ‘if (…) then‘ block. The drop-down menu should already say mouse-pointer by default, if not switch it to mouse-pointer now.
8. Drag and drop the ‘move (…) steps‘ Motion block into the code area and attach it to the bottom of the ‘point towards (…)‘ block inside of the ‘if (…) then‘ block.
Note: Double-check your finished script to make sure that the ‘if (…) then block‘ is inside the ‘forever‘ block, and the two Motion blocks are inside the ‘if (…) then‘ block. It’s easy for a block to attach itself to the wrong section.
Cat Sprite’s Script 1
Our Cat sprite’s first script is very similar to the script you just finished working on for the Mouse sprite since it’s going to chase the Mouse in a similar manner. You can follow the steps outlined below or use the Scratch Backpack to move a copy of the Mouse script over to the Cat sprite and modify the sections that are different.
Note: The backpack is a long white bar located at the bottom of the editor that will open and close when you click on it with your mouse. With the backpack, you to drag and drop costumes, sprites, sounds, and scripts between sprites and other projects. Select the top block of the Mouse script, drag it down to the backpack, and drop it in once you see the backpack highlight to a darker blue. You should see a copy of the script in the backpack, and the original script still in the code area.
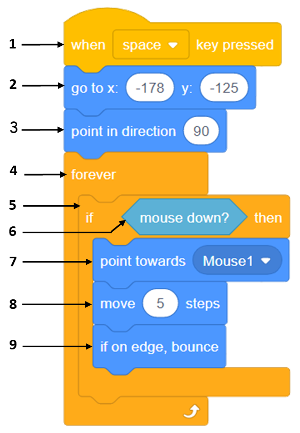
1. Drag and drop the ‘when (…) key pressed‘ Events block into the code area and keep the default space key option.
2. Drag and drop the ‘go to x: (…) y: (…)‘ Motion block into the code area and attach it to the bottom of the ‘when (space) key pressed‘ block. Fill in the x and y values to match the script on your left. You can change the location of your Cat sprite, but we recommend that you have it as far away from the Mouse sprite as possible at the start of the chase.
3. Drag and drop the ‘point in direction (…)‘ Motion block into the code area and fill it in with a value of 90 so that your Cat sprite faces towards the Mouse. Feel free to change this value if you’d like your sprite to face a different direction.
4. Drag and drop the ‘forever‘ Control block into the code area and attach it to the bottom of the ‘point in direction (…)‘ block.
5. Drag and drop the ‘if (…) then‘ Control block into the code area and attach it to the inside of the ‘forever‘ block.
6. Drag and drop the ‘mouse down?‘ Sensing block into the code area and attach it inside the empty slot of the ‘if (…) then‘ block.
7. Drag and drop the ‘point towards (…)‘ Motion block into the code area and attach it to the inside of the ‘if (…) then‘ block. Use the drop-down menu to point towards Mouse 1.
8. Drag and drop the ‘move (…) steps‘ Motion block into the code area and attach it to the bottom of the ‘point towards (…)‘ block inside of the ‘if (…) then‘ block. Switch the number of steps to 5, so the Cat doesn’t move too fast during the chase.
9. Drag and drop the ‘if on edge, bounce‘ Motion block into the code area and attach it to the ‘move (…) steps‘ block.
Note: Double-check your finished script to make sure that the ‘if (…) then block‘ is inside the ‘forever‘ block, and the three Motion blocks are inside the ‘if (…) then‘ block. It’s easy for a block to attach itself to the wrong section.
Cat Sprite’s Script 2
Our second Cat script will continuously monitor the Cat to see if it’s touching the Mouse. Each time it does, the Cat will say Gotcha. Once you learn about variables, you can update this script to keep score instead of saying Gotcha.
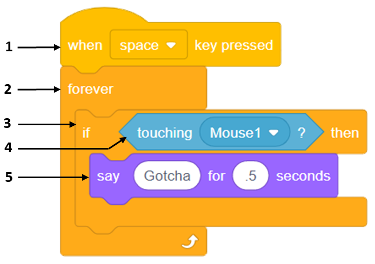
1. Drag and drop the ‘when (…) key pressed‘ Events block into the code area and keep the default space key option.
2. Drag and drop the ‘forever‘ Control block into the code area and attach it to the bottom of the ‘when (space) key pressed‘ block.
3. Drag and drop the ‘if (…) then‘ Control block into the code area and attach it to the inside of the ‘forever‘ block.
4. Drag and drop the ‘touching (…) ?‘ Sensing block into the code area and attach it inside the empty slot of the ‘if (…) then‘ block. Use the drop-down menu to select Moues1.
5. Drag and drop the ‘say (…) for (…) seconds‘ Looks block into the code area and attach it to the inside of the ‘if (…) then‘ block.
Animate Your Sprite Project
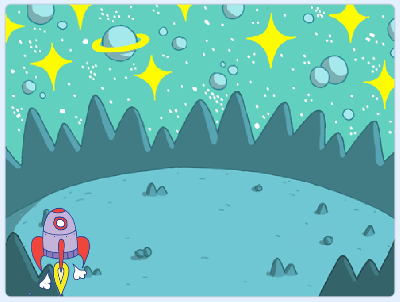
You may have noticed that some of the sprites in Scratch’s Sprite Library have multiple costumes. You can use these extra costumes to animate your sprite, or you can create additional costumes of your own with Scratch’s Paint Editor. When you hover your mouse over a sprite in the Sprite Library, the sprite will cycle through each of its available costumes.
You’ll need to start a new project and decide whether you’d like to use the same backdrop and sprite that we used, or if you’d like to come up with your own setup. The above image uses the Space backdrop and the Rocketship sprite. Once you have your backdrop and sprites picked out, you’ll be ready to program the following scripts:
Animate Your Sprite Script 1
![]()
1. Drag and drop the ‘when green flag clicked‘ Events block into the code area.
2. Drag and drop the ‘go to x: (…) y: (…)‘ Motion block into the code area and attach it to the bottom of the ‘when green flag clicked‘ block. Fill in the x and y values to match the script on your left. Feel free to change the starting location of your Rocketship.
3. Drag and drop the ‘set rotation style (…)‘ Motion block into the code area and attach it to the bottom of the ‘go to x: (…) y: (…)‘ block. Use the drop-down menu to select the left-right rotation style.
4. Drag and drop the ‘forever‘ Control block into the code area and attach it to the bottom of the ‘set rotation style (…)‘ block.
5. Drag and drop the ‘glide (…) secs to (…)‘ Motion block into the code area and attach it to the inside of the ‘forever‘ block.
6. Drag and drop the ‘if on edge, bounce‘ Motion block into the code area and attach it to the bottom of the ‘glide (…) secs to (…)‘ block.
Animate Your Sprite Script 2
![]()
1. Drag and drop the ‘when green flag clicked‘ Events block into the code area.
2. Drag and drop the ‘forever‘ Control block into the code area and attach it to the bottom of the ‘when green flag clicked‘ block.
3. Drag and drop the ‘next costume‘ Looks block into the code area and attach it to the inside of the ‘forever‘ block.
Runners Take Your Mark Project
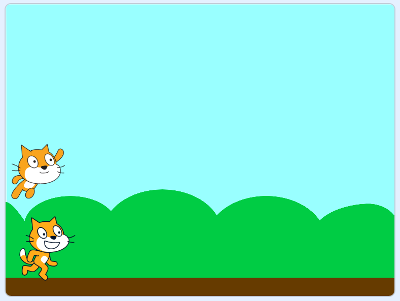
The two scripts for our Runners Take Your Mark project are not only almost identical to each other, but they’re also a combination of everything you’ve been working on so far for your Runners Take Your Mark coding badge. With the help of the one new block in these scripts, the ‘key (…) pressed?‘ Sensing block, you & a friend will be able to race each other using the two Scratch sprites in your first mini-game. Who’s going to run, and who’s going to fly? With just the press of a key, you’ll be off to the races!
As with the other projects in this tutorial, you can use our backdrop and sprite setup, or you can design one of your own. We used the Blue Sky backdrop and two of the Scratch sprites – Cat and Cat Flying.
Running Scratch Script
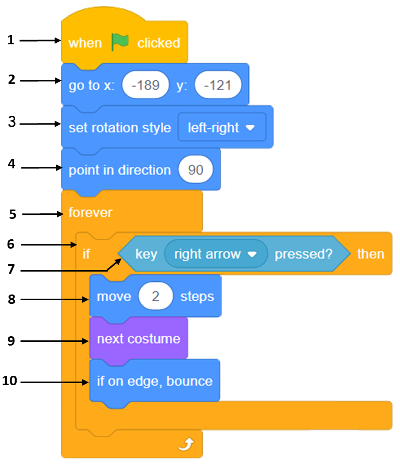
1. Drag and drop the ‘when green flag clicked‘ Events block into the code area.
2. Drag and drop the ‘go to x: (…) y: (…)‘ Motion block into the code area and attach it to the bottom of the ‘when green flag clicked‘ block. Fill in the x and y values to match the script on your left. Our values line the two sprites up evenly for the race.
3. Drag and drop the ‘set rotation style (…)‘ Motion block into the code area and attach it to the bottom of the ‘go to x: (…) y: (…)‘ block. Use the drop-down menu to select the left-right option so the sprites face left and right only as they race back and forth. This will prevent them from racing upside down.
4. Drag and drop the ‘point in direction (…)‘ Motion block into the code area and fill it in with a value of 90 so that your Cat sprite faces forward at the beginning of each race.
5. Drag and drop the ‘forever‘ Control block into the code area and attach it to the bottom of the ‘point in direction (…)‘ block.
6. Drag and drop the ‘if (…) then‘ Control block into the code area and attach it to the inside of the ‘forever‘ block.
7. Drag and drop the ‘key (…) pressed?‘ Sensing block into the code area and attach it inside the empty slot of the ‘if (…) then‘ block. Use the drop-down menu to select the right arrow key option.
8. Drag and drop the ‘move (…) steps‘ Motion block into the code area and attach it to the inside of the ‘if (…) then‘ block. Switch the number of steps to 2. We liked the speed of the race with 2 has the value, but you can change the number of steps, as long as it matches the number of steps in the Flying Scratch script below.
9. Drag and drop the ‘next costume‘ Looks block into the code area and attach it below the ‘move (…) steps‘ block.
10. Drag and drop the ‘if on edge, bounce‘ Motion block into the code area and attach it to the bottom of the ‘next costume‘ block.
Note: Double-check your finished script to make sure that the blocks attached to each other correctly. It’s easy for a block to attach itself to the wrong section.
Flying Scratch Script
Don’t forget, you can use Scratch’s Backpack feature to drag and drop scripts from one script to another. Or you can follow the steps below to code the flying Scratch script below:
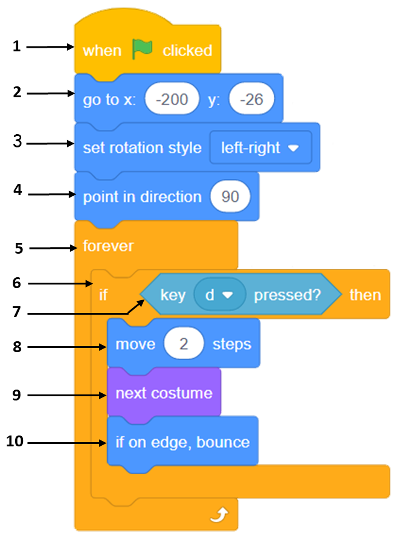
1. Drag and drop the ‘when green flag clicked‘ Events block into the code area.
2. Drag and drop the ‘go to x: (…) y: (…)‘ Motion block into the code area and attach it to the bottom of the ‘when green flag clicked‘ block. Fill in the x and y values to match the script on your left. Our values line the two sprites up evenly for the race.
3. Drag and drop the ‘set rotation style (…)‘ Motion block into the code area and attach it to the bottom of the ‘go to x: (…) y: (…)‘ block. Use the drop-down menu to select the left-right option so the sprites face left and right only as they race back and forth. This will prevent them from racing upside down.
4. Drag and drop the ‘point in direction (…)‘ Motion block into the code area and fill it in with a value of 90 so that your Cat sprite faces forward at the beginning of each race.
5. Drag and drop the ‘forever‘ Control block into the code area and attach it to the bottom of the ‘point in direction (…)‘ block.
6. Drag and drop the ‘if (…) then‘ Control block into the code area and attach it to the inside of the ‘forever‘ block.
7. Drag and drop the ‘key (…) pressed?‘ Sensing block into the code area and attach it inside the empty slot of the ‘if (…) then‘ block. Use the drop-down menu to select the ‘d‘ option.
Note: The w, a, s, and d keys as often used as arrow keys in computer games.
8. Drag and drop the ‘move (…) steps‘ Motion block into the code area and attach it to the inside of the ‘if (…) then‘ block. Switch the number of steps to 2. We liked the speed of the race with 2 has the value, but you can change the number of steps, as long as it matches the number of steps in the Flying Scratch script below.
9. Drag and drop the ‘next costume‘ Looks block into the code area and attach it below the ‘move (…) steps‘ block.
10. Drag and drop the ‘if on edge, bounce‘ Motion block into the code area and attach it to the bottom of the ‘next costume‘ block.
Note: Double-check your finished script to make sure that the blocks attached to each other correctly. It’s easy for a block to attach itself to the wrong section.

