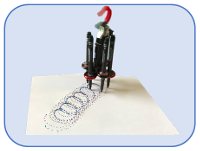
Art Bots are DIY robots that move across your paper in colorful paths with little more than felt tip marker legs, a body of your choice, and a motor. Our version of the Art Bot features a fidget spinner body and a pipe cleaner agitator connected to the motor for maximum movement capabilities.
If you read our About Page then you know that at STEM Detective Lab “We get it wrong, so you can get it right!” Usually, this means we research the materials needed, test several choices for each, and share our findings in an investigative summary section. This information is meant to save you time and money which is what we’re all about. Little did we know when we started this investigation that our fidget spinner body, the piece that would make our Art Bots unique, was going to be our biggest obstacle.
We started this investigation because we noticed an increase in Art Bot projects in the schools around our area. One of the more popular designs we’ve seen uses a disposable plastic cup for the body and electrical tape for the adhesive. These design features are ideal for the classroom, but the Art Bots seemed to tip over frequently.
We decided to design a sturdier Art Bot that you can build with your kids when time and money aren’t an issue. The weight and balance of the fidget spinner were ideal for what we had in mind. Our Art Bot was sturdier, cool looking, and created awesome artwork. The pipe cleaner agitator allowed us to change the Art Bot’s path instantaneously. Unfortunately, the cap covering the ball bearing at the center of the spinner could not hold up to the more rigorous wobbling movements needed to create the best artwork. Whether we used a cheap $3 spinner or a more expensive model we couldn’t get our fidgety Art Bots to last.
Was our investigation a failure? Definitely not. Our choice for the Art Bot body was not ideal but with some careful gluing of the cap over the center ball bearing, we were able to salvage our Bots. Plus, everything we learned during our investigation will help you and your kids design Art Bots of your own.
SUPPLIES
| Materials | Tools |
|---|---|
| Fidget Spinner/ Other material for the body | Scissors |
| Markers | Wire Strippers |
| Motor | Glue Gun |
| Switch | Super Glue |
| Wire | Electrical Tape |
| Battery Case | |
| AA Batteries | |
| Pipe Cleaner | |
| Pencil Cap Eraser | |
| Paper | |
Note: We were able to build our Art Bots for about $2.50 each plus the cost of the fidget spinner body. Your cost will depend on what you end up using for the body of your Art Bot.
Investigation
We created several fidgety Art Bots during our investigation to determine which combination of parts worked best to create crazy, colorful artwork.
FIDGET SPINNER
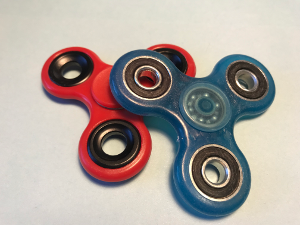
The fidget spinner ended up being the most expensive item on our supply list. Whether we used a $2.99 spinner or a $9.99 spinner the cap covering the ball bearing at the center of the spinner could not hold up to the repetitive wobbling movement. Once we discovered what was happening we were able to carefully super glue the cap in place before attaching the battery pack and motor. As long as we didn’t get any glue on the ball bearing we were able to create the best artwork possible with our fidgety Art Bots.
THE WINNER
Any fidget spinner that is designed with a ball bearing at the center of the spinner only, like the red fidget spinner in the above picture.
INVESTIGATION RESULTS
![]() We preferred using one of the popular 3 prong spinners with the holes on each prong since they were used to hold the felt tip marker legs.
We preferred using one of the popular 3 prong spinners with the holes on each prong since they were used to hold the felt tip marker legs.
![]() We couldn’t find any spinners at the local dollar store, but we were able to find plenty of models for $2.99 or more at area department stores. We recommend searching your kid’s closet before investing $3 on an Art Bot body.
We couldn’t find any spinners at the local dollar store, but we were able to find plenty of models for $2.99 or more at area department stores. We recommend searching your kid’s closet before investing $3 on an Art Bot body.
![]()
We started this project expecting to add additional movement capabilities to our Art Bots by making use of the rotating prongs on spinners like the blue one in the above image. Unfortunately, the ball bearing design on the prongs couldn’t hold up to the wobbling movement needed to propel our Art Bots across the paper.
If you do use a fidget spinner with a ball bearing on the prongs be careful not to force the markers in too tight and have additional super glue ready. The black gaskets and metallic rings that surround the ball bearing tend to disconnect easily, especially if you’re trying to dislodge a stuck marker.
FELT TIP MARKERS
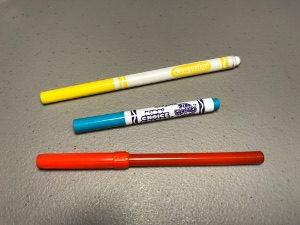
The size of the marker you need will depend on the size of the holes on the prongs of your fidget spinner. If the Crayola markers are too wide for your spinner you can try your local dollar store. The Dot brand markers at the store near us tapered towards the marker tip, allowing it to fit through the narrower holes.
We built several fidgety Art Bots to test a variety of markers. We tested tall markers against short markers and wide-tipped markers against fine tip markers. Good thing we had a lot of markers lying around!
THE WINNER
Tall, fine tip markers. The Crayola super tip markers also work since they have the small tip as well. The smaller tip improved the wobbling effect.
Note: We highly recommend using washable markers. Our Art Bots did not like staying on the paper.
INVESTIGATION RESULTS
![]() We recommend you choose your markers after you know the style of your fidget spinner. Crayola markers were too wide for the fidget spinner holes with a ball bearing. The tapered markers from the local dollar store were too narrow for the spinners without a ball bearing.
We recommend you choose your markers after you know the style of your fidget spinner. Crayola markers were too wide for the fidget spinner holes with a ball bearing. The tapered markers from the local dollar store were too narrow for the spinners without a ball bearing.
![]() Fine tip marker legs wobbled better than wider tip marker legs.
Fine tip marker legs wobbled better than wider tip marker legs.
![]()
Taller marker legs wobbled better than short marker legs.
MOTOR
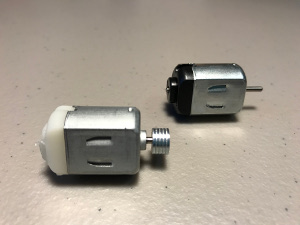
Which Motor Works Best?We built our first Art Bot using the vibration motor from an electric toothbrush found at the local dollar store, seen on the left in the above picture.
We built the rest of our Art Bots using a DC motor, seen on the right in the above picture, after finding an entire DC motor kit on Amazon. This kit included 6 sets, each containing the motor as well as a rocker switch, motor bracket, battery holder, and additional wire.
Do you really need everything in this kit? Maybe not, but we weren’t able to beat the price at the time of our investigation and your kids will gain additional experience with electronics when they learn how to wire a switch to the battery pack.
THE WINNER
The EUDAX 6 Set Small DC Motor Mini Electric Hobby Motors from Amazon.
INVESTIGATION RESULTS
![]() The off-centered weight at the end of the vibration motor’s shaft was the same diameter as the end of a pencil cap eraser. This allowed us to create numerous eraser agitators that we could interchange on the fly to alter the Art Bot’s wobbling movements. This is the one feature we missed once we switched to the DC motor.
The off-centered weight at the end of the vibration motor’s shaft was the same diameter as the end of a pencil cap eraser. This allowed us to create numerous eraser agitators that we could interchange on the fly to alter the Art Bot’s wobbling movements. This is the one feature we missed once we switched to the DC motor.
![]()
We broke down the costs for designing our Art Bots with both motor options. In the end, the convenience of removable eraser agitators was not enough to compete against the better priced, complete DC motor kits.
![]()
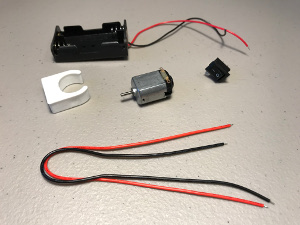
The DC motor kit included two styles of 2×1.5V AA battery holder cases. Three of the cases came with a metal swing arm switch built in, the other three cases need to be wired to the rocker switch.
Having both styles is convenient when you’re working with several kids. Some kids will enjoy the challenge of wiring a switch to the battery/motor setup while other kids may enjoy a simpler version, allowing them to get to the testing phase sooner.
![]()
The spare wires that come with the kit have a thicker insulation than the wires attached to the battery holder. These wires were harder to strip but since the wires attached to the battery holder were longer than needed we removed part of them to use instead. The thinner wires stripped effortlessly.
![]()
We originally thought we could glue the motor to the battery holder directly, but a small section of the axle protrudes from the bottom of the motor. Any interference with the spinning of the axle will slow down the motor which in turn will slow down the wobbling movement. The motor bracket helps prevent any issues with interference.
PAPER
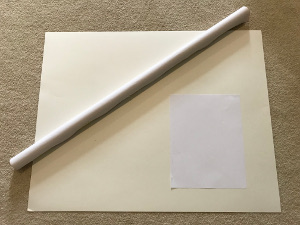
You may think that choosing paper is straightforward but during our investigation, we noticed our Art Bots wobbled off the 8 1/2″ x 11″ sheet of paper faster than expected. Bigger is definitely better with the paper!
THE WINNER
A sheet of poster board for a small group of kids or a roll of paper for a classroom project.
INVESTIGATION RESULTS
![]() Using a sheet of poster board or a roll of paper allows kids to enjoy their Art Bots together. This is a great chance for kids to experience some teamwork.
Using a sheet of poster board or a roll of paper allows kids to enjoy their Art Bots together. This is a great chance for kids to experience some teamwork.
Instructions
Dual Fidgety Art Bot
(printable instructions)
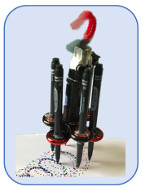
Our instructions will take you through the step by step procedure to build a Dual Fidgety Art Bot, an Art Bot built with two fidget spinners stacked together. Since our investigation revealed the disadvantage of using a fidget spinner body we will walk you through building the motor circuit with an attached switch first. You can then modify the rest of our steps to fit your own design.
Note: This is a great time to send your kids on an investigation of their own. Let them put their critical thinking skills to the test as they decide what features are needed for a successful Art Bot body. Once they decide on the features needed, send them to their rooms so they can raid their closet.
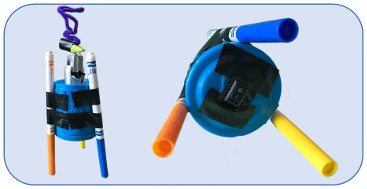
We raided our supplies to see what alternatives we could come up with. There were plenty of options to choose from as you can imagine. We chose a large trash can from the Trash Pack toy set because we were able to hide the battery, wires and most of the switch inside.
We enjoyed building our Trashy Art Bot just as much as our Fidgety Art Bot.
Step 1 – Supplies:

1.1 We divided our supplies into two groups. Image 1.1 consists of the supplies used to wire our motor to a power source. Image 1.2 consists of the supplies used to build the Art Bot body.
Note: There’s a good chance that your supply list will vary from ours on this project, especially if you and your kids decide to design your own Art Bot.
1.2 You will also need electrical tape and a glue gun to complete this project.
Step 2 – Testing:
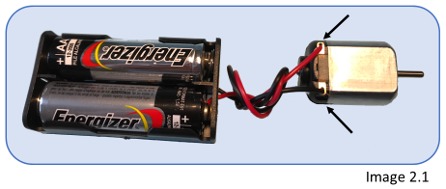
2.1 If you haven’t already done so, be sure to test your motor and batteries. Place the AA batteries into the battery holder and then touch the red and black wires from the battery holder to the two copper terminals on the motor (Image 2.1).
Note: The polarity doesn’t matter when testing to see if the DC motor works. The polarity only matters when the rotational direction of the motor matters. If you connect the positive (red) wire to the positive motor terminal and the negative (black) wire to the negative motor terminal the motor will rotate clockwise. Reverse the wires to have the motor rotate counterclockwise.
During our investigation we read that some DC motors may rotate in the opposite direction, depending on the manufacturer. Just switch the wires around to get the rotational direction your project needs.
Note: Some motors will have the positive and negative terminals marked. The motors from our sets don’t but the schematics provided shows which terminal to connect the red (positive) wire to.
2.2 If you’re using older markers be sure to test them as well. Old, dried out markers will create faded artwork.
2.3 We recommend that you test the motor a second time after you’ve wired the switch. This will verify that the switch works and that you didn’t damage anything while stripping the wires.
Step 3 – Wiring DC Motor to AA Batteries with an On-Off Switch
The EUDAX DC Motor kit that we’re using comes with two styles of AA battery holders, one with a built-in metal swing arm and one without. We’ll take you through the process of using a battery holder without the swing arm, so you can see how to add an on-off switch to a circuit.

3.1 The battery holder wires, as well as the extra red wire needed later, come with some of the insulation already stripped off at the ends, but it’s not enough (Image 3.1).
You need to strip the wires until there’s about 5/8″ of bare wire on the ends of each wire so there’s enough bare wire to twist around the components (Image 3.2 & 3.3).
Note: Without the longer wire to twist around the components the wire tends to come apart while the Art Bots are wobbling around.
3.2 Carefully fold the red and black wires of the battery holder up against the back of the holder and attach them with electrical tape (Image 3.4).
3.3 Attach the motor’s mounting bracket to the end of the battery holder (Image 3.5).
Note: Attaching the mounting bracket now will help you determine if the battery holder’s wires are long enough to complete the wiring of the motor.
3.4 If the wires are too short you will have to splice two pieces of wires together and secure with electrical tape (Image 3.6).
Note: The first set of spliced wires in Image 3.6 slide apart easily. We found that the second set of wires stayed connected better due to the bend we added in the wire.
3.5 It’s time to connect the battery holder’s red wire to one of the metal prongs located under the switch. Thread the end of the red wire through the hole in one of the prongs until half of the bare wire is through the hole (Image 3.7, step 1).
3.6 Bend the bare wire back towards itself (Image 3.7, step 2), and twist the end around the rest of the bare wire (Image 3.7, step 3).
3.7 The battery holder is now wired to the switch (Image 3.8).
You will use the same technique to complete the rest of the wiring.
Note: Don’t secure any of the wires with electrical tape yet. During our investigation, we found it easier to troubleshoot any issues with our circuits while the wiring was still visible. Most issues were the result of disconnected wires.
3.8 If you didn’t strip the extra insulation off of the second piece of the red wire during Step 3.1 you should do that now. Both ends of this second piece should also have about 5/8″ of bare wire showing (Image 3.2 & 3.3).
3.9 Thread one end of the second piece of red wire through the hole in the second prong until half of the bare wire is through the hole. Bend this wire back towards itself and twist the end around the rest of the bare wire (Image 3.9).
3.10 It’s time to test the switch. Gently insert the bare end of the black and red wires to the two motor terminals and turn the switch on and off to verify the motor is working (Image 3.10).
3.11 With the wires through the contacts, bend them back towards themselves and twist the ends around the rest of the bare wire for a solid connection (Image 3.11).
3.11 Double check that everything still works and then secure all the wire connections with electrical tape (Image 3.12).
Note: The electrical tape did not want to stick to the wire connections initially. Once we cut the tape in half, lengthways, and stretched the tape before using we were able to keep the electrical tape secure.
3.12 Attach the motor to the mounting bracket and secure it with some glue from a glue gun (Image 3.13).
3.13 Attach the switch to the side of the mounting bracket and secure it with some glue from the glue gun (Image 3.13).
Note: Attach the switch near the top of the mounting bracket so it doesn’t hit any of the rotating marker legs.
Congratulations, you just wired the DC motor to a switch and power source.
Step 4 – The Body
It’s time to assemble the body of our Art Bot and attach the motor. There’s a very good chance that you’re using a body design of your own. If so, be sure to include an agitator on your motor for maximum wobbling movement.
Every Fidgety Art Bot we built had complications with the cap that covers the center ball bearing. The cap would come loose and dislodge every time, no matter the cost of the spinner. But have no fear, we found a reliable workaround, as long as you can carefully glue the cap in place.

4.1 Gently remove the cap from the center ball bearing and carefully apply a small amount of super glue around the outside of the center plug, located on the underside of the cap (Image 4.1).
4.2 Carefully push the cap back into place and let it dry according to the instructions on the glue bottle (Image 4.2).
4.3 Insert the markers into the prong holes (Image 4.3).
4.4 Use hot glue to fasten the markers inside the holes on each fidget spinner prong, leaving one prong empty until the motor has been installed (Image 4.3).
Note: This step can be a bit tricky for kids as the markers need to be positioned completely straight and level. They may need your help.
4.5 Use hot glue to attach the bottom of the motor assembly to the cap in the center of the fidget spinner (Image 4.4)
Note: You may need to use electrical tape to secure any loose wires to the back of the battery holder. Loose wires will interfere with the Art Bot’s legs and motor as it spins across your paper.
4.6 Insert and fasten the last marker into the empty spinner prong (Image 4.5).
4.7 The Art Bot is almost finished but without an agitator, it won’t have enough of a wobble.
Bend the pipe cleaner in half and attach it to the side of the pencil cap eraser with a piece of electrical tape (Image 4.6).
4.8 Hold the pencil cap eraser sideways and slowly push it down on the motor axle until the axle pushes through the eraser. We added a small dab of hot glue where the axle pushed through the eraser, so it stays on while the Art Bot is wobbling across your paper (Image 4.7).
4.9 Bring out the paper, it’s time to test your Art Bot. Remember to change the shape of the pipe cleaner agitator to see how the Art Bot’s path changes.
Have your kids analyze their findings and use this information to create amazing artwork.
ENJOY!
Trouble Shooting
Murphy’s Law – “Anything that can go wrong will go wrong”
As you and your kids enjoy building the projects on our website, we know you’ll have no trouble finding solutions to any problems you may run into. Failure can actually be beneficial as it serves as a learning opportunity. But our goal at STEM Detective Lab is to save you a little time and money so you have more time with your kids. The following information is a list of issues we ran into while building our Fidgety Art Bots:
Problem/Solution: The center cap covering the fidget spinner ball bearing cannot stand up to the constant wobbling movement needed to produce the best artwork. It becomes dislodged every time.
Remove the cap, apply super glue around the round plug on the underside of the cap, and place it back over the ball bearing.
Problem/Solution: If your magic marker legs tilt inward, even a little bit, they will interfere with the spinning of the Art Bot body.
Help your kids as they attach the markers. Two hands are better than one with this step.
Problem/Solution: The electrical tape doesn’t always stay attached to the wires.
Stretch the tape before using it and for smaller jobs like securing the wires try using narrower strips by cutting the tape in half lengthwise.
Problem/Solution: The first time we attached our battery holder to the center of the fidget spinner we added a piece of electrical tape to the bottom of the holder. We thought this would keep hot glue from getting in the case.
Do NOT worry about taping the holes on the bottom of your battery holder. It eventually comes off the holder leaving you with an unattached motor. Plus we never had a problem with the hot glue getting into the battery holder anyway.

