A DIY Hexbug Nano Investigation
BrushBot Safety Warning
There have been multiple reports of life-threatening injuries to children who have swallowed coin cell batteries. Experts have explained that this is the result of the current in the battery causing a chemical reaction, leading to burns in the esophagus.
Please keep all coin cell batteries and other small parts used in this activity away from young children.
BrushBot Printable Instructions
The Hexbug Nano is a little toy bug that scurries across the floor to the delight of children and pets everywhere! A quick Google search will show you a variety of BrushBot projects, but which vibration motor should you buy? Are all batteries the same? By the time you finish reading this post, you’ll have the answers to these questions and more.
During our investigation we created numerous BrushBots of our own, putting the different options to the test to save you both time and money. I must confess we enjoyed stocking our new lab with all the extra supplies.
We’ve divided our investigation into three tabs below, allowing you to access information in the order that works best for you. If you already have the needed materials, feel free to jump straight to the Instructions tab. But if you’re not sure where to start or what supplies you should buy, check out the Investigation tab first.
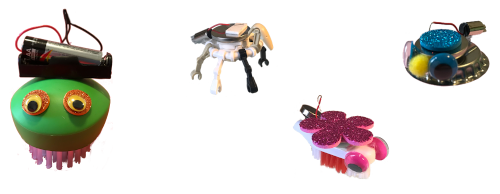
Finally, we’ve included bonus instructions for a BigBot at the end of this post. This bot is an excellent example of what your kids can create with a few items from your local dollar store and a little imagination. In fact, we highly recommend you challenge your kids to design a BrushBot of their own.
Enjoy building your very own BrushBot!
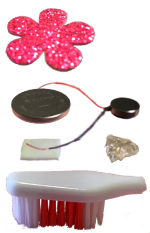
SUPPLY LIST
| Supplies | Tools |
|---|---|
| Toothbrush | Scissors |
| Motor | Wire Strippers |
| Battery | Wire Cutters |
| Adhesives | Glue Gun if available |
| Accessories | |
Note: We were able to build our BrushBots for about $2.20 each back in 2018. The 5-piece pack of coin mobile phone vibration motors we purchased off Amazon has doubled in price as of 2023, raising the cost to $3.30 each. But, you can keep this price down if you can buy them in 20-piece packs instead.
Your cost will depend on how many bots you plan on building and how many supplies can be bought with coupons. However, some of the supplies can only be purchased in multi-packs, which adds to the initial cost.
INVESTIGATION
BrushBot Safety Warning
There have been multiple reports of life-threatening injuries to children who have swallowed coin cell batteries. Experts have explained that this is the result of the current in the battery causing a chemical reaction, leading to burns in the esophagus.
Please keep all coin cell batteries and other small parts used in this activity away from young children.
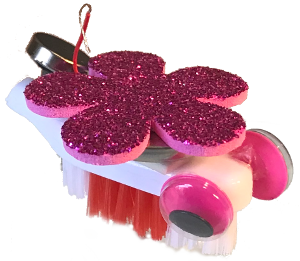
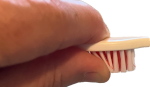
Toothbrushes
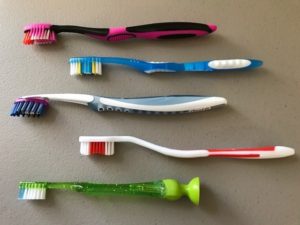
The choices are endless! Kid brushes, adult brushes, soft-bristled, medium-bristled, and the occasional hard-bristled brushes. And let’s not forget the straight, angled, and even curved versions of each. As a result, we built a lot of BrushBots during this investigation.
The Winner
A medium, straight-bristled adult brush with a flat head from the local dollar store.
Investigation Results
First, several of our BrushBots tended to tip over or move in the wrong direction. Luckily, we discovered several options to remedy this issue:
1. Use a decorative, self-stick foam piece on top of the battery for better weight distribution. Not only is this an attractive solution, but we used the self-stick foam to attach the motor’s second wire to the top of the battery.
2. Use your fingers to apply pressure against the bristles in a backward direction to slant the bristles. After that, your BrushBot should move in a forward motion.
3. Re-position the weight of the battery/motor setup when your BrushBot spins in a circle due to uneven weight distribution.
4. If you have time and a glue gun, pipe cleaner legs are a fun way to add stability. Surprisingly, we found it hard to keep the legs attached without the glue gun.
Second, we also had difficulty keeping the battery/motor setup on some of the fancier toothbrushes. Toothbrushes with ridges on the heads prevented the foam tape from having enough surface area to stick successfully. Although, if you’re using a glue gun, this won’t be a problem.
Motors
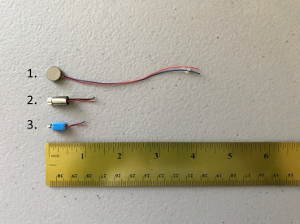
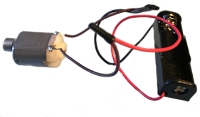
We found three vibration motors on Amazon that looked like they were just what we needed. We’ve listed these in a top-to-bottom order in the above image:
1. Coin Mobile Phone Vibration Motor – referenced as Motor 1.
2. Vibration Motor for RC Toy – referenced as Motor 2.
3. Pager Cell Phone Vibration Motor – referenced as Motor 3.
The Winner
The Coin Mobile Phone Vibration Motor from Amazon (Motor 1).
Investigation Results
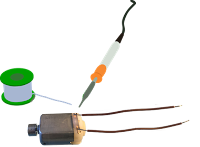
First, we struggled quite a bit at the beginning of our testing phase due to the shortness of the exposed wire section on the motors. Once we used wire strippers to remove enough of the insulation to expose about 1/4 inch of wire, we were able to consistently make a connection when using the foam tape to stick the wires to the battery.
Second, the wires on these motors ranged from 26-30 AWG. You’ll want to verify that your wire strippers can handle the thinner wire. If not, you should purchase a new pair while ordering your supplies. Without stripping the wires, we couldn’t get enough contact on the battery.
Third, if you use a motor with a weight on it, position the motor in a spot where the weight can spin.
Coin Mobile Phone Vibration Motor: We were only expecting the two motors with the spinning, off-centered weight attached to the motor shaft to work, so we were pleasantly surprised to find that all five motors in this package worked, and the vibration was strong enough to propel our BrushBots all over the place.
The length and durability of the wires were the deciding factor for this motor to be our top choice. Both Motor 1 and Motor 3 did a great job vibrating our BrushBots. Unfortunately, the wires on Motor 3 broke more easily during the stripping process, and the wires were too short to use on an AA battery.
Vibration Motor for RC Toy: Seven of the ten motors from this package worked and were the most powerful motors tested. Unfortunately, they were too strong for our needs and our BrushBots tipped over repeatedly.
However, this motor may be for you if you have a glue gun, pipe cleaners, and the time to make legs. The wires are durable and just long enough that you have room for error when stripping them and the older kids may enjoy the challenge.
Pager Cell Phone Vibration Motor: All ten motors from this package worked and vibrated our BrushBots nicely. Our only issue with this motor was how easily the wires broke while we were stripping them. If you’re an old pro at stripping wires and can get these at a better price than the first motor, then go for it – unless you’re hoping to use them with an AA battery which will require longer wires.
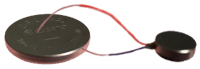
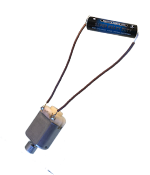
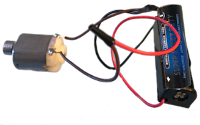
Batteries
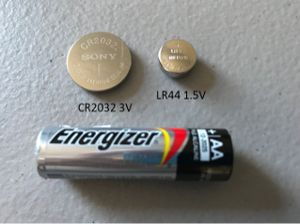
We tested our BrushBots with the Sony CR2032 Lithium 3V and the Maxell LR44 1.5V Alkaline battery. We tested our BigBot with the Energizer AA battery.
The Winner
The Sony CR2032 Lithium 3V battery from Amazon.
Investigation Results
First, all batteries tested ran nonstop for over an hour at which time we stopped monitoring them. We chose the CR2032 battery only because the weight was distributed better. The LR44 battery made the BrushBots a little top-heavy but are not a bad option, especially if you already have them around the house for your HexBug Nanos.
Second, there are plenty of battery options out there that will work just fine, but we don’t recommend buying them without comparing prices first. The CR2032 and LR44 batteries that we bought on Amazon have been in our junk drawer for at least 2 years, they still work great and they were bulk purchases from Amazon for a more reasonable price. However, be careful and read the reviews as there are knock-off batteries available that don’t work as well.
Adhesives
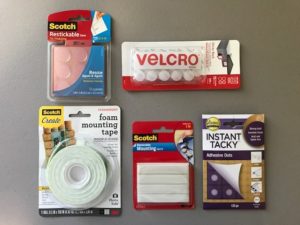
We tested a random assortment of adhesive materials just to stock up our lab and have a little fun. Whatever adhesives you go with we recommend you test them out yourself first. We found that some options worked great on the metal batteries but not so well on the plastic toothbrushes.
The Winner
The 1/2-inch Scotch foam mounting tape and Instant Tacky ‘sticky dots’.
Investigation Results
First, the foam tape worked great keeping the motor wires attached to the battery, and it worked well on both metal and plastic. We especially liked the fact that we could reuse each piece several times before it stopped sticking. This allowed us to move the battery setup around as we ran our tests.
Second, the Instant Tacky sticky dots were perfect for attaching the googly eyes and motor onto the toothbrush. We were able to reuse each dot repeatedly and broke the dots in half for the eyes without having any issues. These sticky dots reminded us of the rubber cement balls we made as kids during art class.
Third, we liked that the Scotch Restickable dots were large, clear circles but they didn’t stick well the second time and they weren’t pliable like the Instant Tacky sticky dots. Not all ‘sticky/stickable’ dots are the same.
Fourth, the Scotch removable mounting putty didn’t work for this project, but we will find a use for it in the coming months.
Fifth, we thought self-stick Velcro would allow us to easily move the battery/motor setup from one brush to another for testing purposes, but the Velcro prevented the motor vibrations from reaching the BrushBot.
Accessories
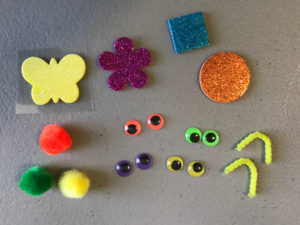
The accessories are endless, just raid your craft drawer and let your children surprise you with their designs. The sky’s the limit with a child’s imagination!
The Winner
Googly Eyes to add character to our creations and self-stick foam pieces to hold the motor wires onto the battery and provide stability. Available at any local craft store.
If you don’t mind buying googly eyes in larger quantities, then see what Amazon has to offer first. Generally, buying in bulk can save you money in the end.
Investigation Results
Self-stick foam and sticky dots worked great for attaching the accessories, especially if you’re in a classroom setting. Although, if you have the time a glue gun works better for pieces you want to stick more permanently.
INSTRUCTIONS
BrushBot Printable Instructions
BrushBot Safety Warning
There have been multiple reports of life-threatening injuries to children who have swallowed coin cell batteries. Experts have explained that this is the result of the current in the battery causing a chemical reaction, leading to burns in the esophagus.
Please keep all coin cell batteries and other small parts used in this activity away from young children.
Step 1: Test
1.1 Take the bare ends of the two wires attached to the vibration motor, place one on each side of the battery, and press firmly. When you feel the motor vibrate, you know both the battery and the motor work.
Note: Always test any electronic or moving parts before you use them and anytime you modify them.
Step 2: Preparation

2.1 Toothbrush
Use a pair of wire cutters to cut the handle off the toothbrush.
With your fingers, apply pressure against the bristles of the toothbrush head in a backward direction to slant the bristles. This will help your BrushBot move in a forward motion.
2.2 Wires
Use a pair of wire strippers to remove enough insulation from the motor’s wires to expose 1/4-inch – 1/2-inch of bare wire.
Once you’ve stripped the wires, re-test the motor to make sure you haven’t damaged the motor or wires during the stripping process.
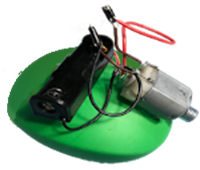
Step 3: Assemble
3.1 Firmly place the ½-inch piece of Scotch foam mounting tape on top of the toothbrush head just to the left of its center.
3.2 Place one of the Instant Tacky sticky dots on top of the toothbrush head near the cut end.
3.3 Place the motor on the sticky dot and one of its wires on the foam tape.
3.4 Press the battery firmly on top of the wire stuck to the foam tape, then set the second motor wire on top of the battery.
3.5 Stick the piece of self-stick decorative foam on top of the battery and make sure the top wire is between the decorative foam and the battery. Be sure to press the wires into place firmly as the motor will only vibrate once you’ve made an electrical connection.
3.6 Carefully pull the second wire out from under the decorative foam to stop the motor from vibrating.
Note: The red (+) and black (-) wires on a motor sometimes need to connect to the corresponding positive (+) and negative (-) sides of a battery, but it doesn’t matter for this activity.
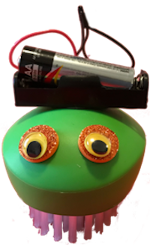
Step 4: Finish

4.1 Add the googly eyes and any other accessories you may have to your BrushBot.
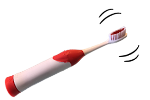
Congrats, you’ve just built your very own mini robot.
Let your BrushBots vibrate their way freely around the floor or have your kids create a maze it can scurry through.
A DIY BigBot Investigation

We took a trip to our local dollar store, bought an electric toothbrush along with a vegetable brush, and then upgraded our BrushBot into BigBot – a fun variation to the popular mini robot.
Gather the materials listed in the Supply List tab and warm up your glue gun. This larger version of the BrushBot is a perfect way to appeal to your older kids. In fact, you should let your older kids shop with you and let them pick out their supplies.
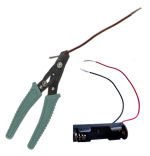
SUPPLY LIST
| Supplies | Tools |
|---|---|
| Electric Toothbrush (Battery & Motor Included) | Glue Gun |
| 2 x 3-inch Piece of Electrical Wire | Wire Strippers |
| Vegetable Brush | Soldering Iron & Solder |
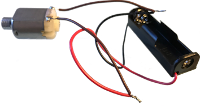
| AA Battery Holder | Small Saw |
| Accessories | Electrical Tape |
INVESTIGATION

Since our BigBot was a cool upgrade to the above BrushBot, our investigation was short and sweet.
Toothbrush
First, we tested five electric toothbrushes from the local dollar store and found that only four of them worked. Purchasing an extra brush or two is a good idea, especially if this is a class project.
Second, you should retest your motor after removing it from the toothbrush to make sure it didn’t break during the process.
Electrical Wires
We were able to use one 6-inch wire by cutting it in half and then stripping the ends so there was a 1/2-inch of bare wire showing.
AA Battery Holder
The AA battery holder is optional. But it will make it easier to turn your BigBot on and off, and your kids will love wiring it up.
INSTRUCTIONS
Step 1: Test
1.1 Battery and Motor
Insert the battery into the electric toothbrush and turn it on. When you feel the toothbrush vibrate, you know both the battery and the motor work.
Note: Always test all electronic and moving parts before you use them and anytime you modify them.
Step 2: Preparation
2.1 Wires
Use a pair of wire strippers to remove enough of the rubber insulation to expose a 1/4-inch – 1/2-inch of bare wire from both ends of the 3-inch strips of wire and the ends of the two wires attached to the AA battery holder.
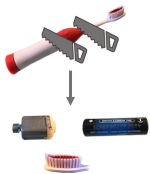
2.2 Toothbrush
Use a small saw to remove the top and bottom sections of the electric toothbrush just above and below the brush’s internal motor.
Carefully tap the motor out of the remaining plastic tube. Remove the spring if it’s still attached.
You should now have a vibrating motor, an AA battery, and a spare toothbrush head.
2.3 Retest the Motor
Hold one end of the first wire to the positive (+) end of the AA battery while you hold the other end of that wire to one of the copper contacts on the motor.
Hold one end of the second wire to the negative (-) end of the AA battery while you hold the other end of that wire to the other copper contact on the motor. When you feel the more vibrate, you know nothing broke when you disassembled your toothbrush.
If you don’t feel the motor vibrate, double-check that you’re holding the wires correctly. The bare ends of the wires must be in contact with the copper contacts and the battery at the same time to make the connection between the battery and the motor. You may need help holding the wires in place.
If you still don’t feel the motor vibrate, start over with a new toothbrush, and be careful as you remove the motor from the toothbrush handle.
Step 3: Assembly
3.1 Solder the 3-inch Wires to the Motor
Use the soldering iron to solder one end of the first 3-inch piece of wire to one of the motor’s copper contacts.
Use the soldering iron to solder one end of the second 3-inch piece of wire to the motor’s other copper contact.
3.2 Test the Soldered Wires
Once you solder the two 3-inch pieces of wire to the copper contacts, hold the other end of each wire to the battery, one at each end. You need to be sure that the bare section of each wire is touching one end of the battery.
When you feel the motor vibrate, you know you’ve soldered the motor’s copper contacts correctly. If you don’t feel the motor vibrate, you will need to resolder the wires.
3.3 Connect the Motor to the AA Battery Holder
Twist the bare wire at the unused end of one of the motor wires to the red (+) battery holder wire.
Twist the bare wire at the unused end of the other motor wire to the black (-) battery holder wire.
Note: Polarity, the direction the current flows in an electrical circuit, doesn’t matter with this motor, so it doesn’t matter which end of the battery the motor wires connect to.
3.4 Secure the Wires
Wrap the connected wires with a small strip of electrical tape so the wires don’t come loose when the motor vibrates. The electrical tape will hold better if you stretch each strip of tape before using it.
3.5 Test the Connection Between the Motor and the AA Battery Holder
Place an AA battery into the battery holder. Again, you should be able to feel the motor vibrate. If not, remove the electrical tape and retwist the wires until a connection is made. Once the motor vibrates, reapply the electrical tape around the ends of the wires.
Remove the battery from the holder so you can finish building your BigBot.
3.6 Attach the Motor and Battery Holder to the Vegetable Brush
Use the glue gun to attach the battery holder to the top of the vegetable brush.
Use the glue gun to attach the motor to the very end of the vegetable brush so the weight at the end of the motor isn’t obstructed by the brush.
Step 4: Finish
4.1 Decorate
Attach the googly eyes and decorative foam at the front of the vegetable brush. You can also add any additional accessories you may have to add character to your BigBot.
Congratulations, you just finished building your very own BigBot. Place the AA battery back in the battery holder and watch the big guy go.
Now that you and your kids are expert BrushBot builders why don’t you let them loose with the extra motors and batteries you have and see what else they can come up with? See if they can determine why some objects make a great bot and why some don’t.
Thank you for joining us for our very first post. I hope you and your kids had as much fun as we did!