Are you looking for a quick Halloween activity? Or an engaging STEM lesson? Our Haunted Hovercraft post fits the bill for either scenario. This DIY hovercraft is quick & easy to build and the supplies are easy to come by. Plus, the hovercraft is a great example of Newton’s third law of motion at work.
Haunted Hovercraft Printable Instructions
The hovercraft is an amphibious vehicle that can travel over land and water. Its engine-powered fan traps a cushion of air under the hull to float on top of and its floating height is determined by the power of the engine(s) and the size/weight of the vehicle.
We saw our first balloon hovercraft during an episode of The Big Bang Theory. We were instantly intrigued since this DIY hovercraft seemed like a fun way to introduce kids to Newton’s third law of motion: for every action, there is an equal and opposite reaction. As air escapes from the balloon, it’s forced downward through the open bottle top and the hole in the CD. This downward force of air creates an opposite force of air upwards to lift the hovercraft off the surface below.
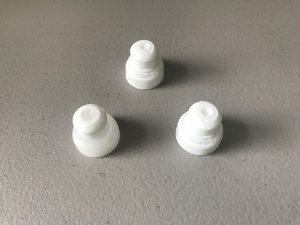
During our investigation, we created several hovercraft to find an alternative to using a CD as our hovercraft’s hull, or base. The CD drive is quickly becoming irrelevant, so finding a new material seemed like a fun challenge. Unfortunately, even though we had some decent test runs with the coffee lid hovercraft, the smoothness and weight distribution of the CD couldn’t be beat.
This DIY hovercraft’s cost is minimal and most of the supplies can be found around your house.
We created, and tested, several balloon hovercraft designs during this investigation, most of which worked 40 to 50 percent of the time. The hovercraft with a CD for the hull was the only design that worked every time. We couldn’t track down who originally came up with this clever idea, but we hope your kids enjoy building their haunted version as much as we did. Note: We used a glue gun for our adhesive because it creates a stronger, longer-lasting, bond than other options, it’s non-toxic, and it’s such a fast way to glue. We didn’t feel the need to investigate other adhesives since our goal was to find a fun, last-minute Halloween activity. We tested several materials for the hull of our hovercraft, but none worked as well as the CD due to a lack of consistency. Any old CD or DVD you can find around your house. First, the paper bowl and meat tray were too heavy when using a balloon for the air source. Second, the hot glue tended to melt our coffee lids, but only when applied directly on the lid. When we placed the hot glue on the other surface first, the glue had time to cool down just enough to prevent the lid from melting. Third, the coffee lid was our second favorite material to use for the hull. It was inexpensive and lightweight, and the attempts that worked did so quite well. Unfortunately, our success rate wasn’t consistent enough to beat the CD for the favorite hull material. However, altering the size and location of the hole(s) on the coffee lid helped give the hovercraft enough lift to float. Finding the best size and location for these hole(s) could be an interesting challenge for your older kids. We didn’t test alternative options for the airflow mechanism. The push/pull style bottle tops were easy to come by, they were the ideal size for the hole at the center of the CD, and they allowed us to alter the amount of airflow we used by adjusting how far up we pulled the bottle top. We tested a variety of balloons to find the best option for our hovercraft. A 9″ balloon with the shortest neck possible. First, the open end of 7″ balloons didn’t quite fit over the bottle top used with our hovercraft design. Second, any balloon larger than 9″ was too top-heavy for our hovercraft design. If you need to use larger balloons, you will need to help your kids create a collar to prevent the balloon from tipping over. Third, not all 9″ balloons have the same neck length. Look for 9″ balloons with the shortest neck to prevent the balloons from tipping over. Fourth, each balloon tested stretched from repetitive use. Your kids can continue to use their hovercraft while the balloon leans sideways, or they can add a collar for support. Last but not least, any face drawn on the balloon before it’s blown up will appear faded once the balloon is full size. Note: The ink on the balloon will also fade over time as the balloon stretches. Keep the markers handy so your kids can touch up their spooky faces as they’re having fun.
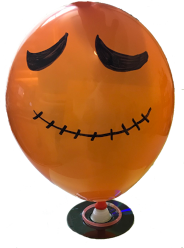
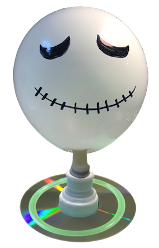
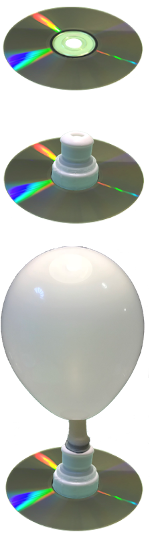
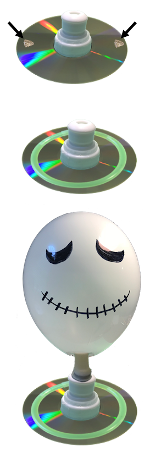
Haunted Hovercraft Printable Instructions The balloon hovercraft is quick and straightforward to build, plus there’s a good chance you already have the supplies needed. It’s time to kick back, relax, and watch your kids build and deck out their very own Haunted Hovercraft. Note: We used a white balloon and a glow-in-the-dark bracelet to give our hovercraft a ghostly appearance when used in a dark room. Similarly, a Spooky jack-o-lantern face drawn on an orange balloon, or a Frankenstein face on a green balloon are additional spine-chilling ideas your kids may enjoy. 1.1 You can make a balloon hovercraft with as little as three supplies – a CD, a 9″ balloon, and a push/pull style bottle top from a water bottle or sports drink. 1.2 An optional glow-in-the-dark bracelet attached with Instant Tacky Sticky Dots and a spooky face drawn on the balloon with a permanent marker is one way to transform your hovercraft into a delightfully haunted vehicle. 2.1 Place the CD blank side up to hide any printing on the labels. 2.2 Glue the bottle top over the hole, located at the center of the CD, and make sure the bottle top is in the closed position. 2.3 Blow up your balloon, then twist the end of the balloon a couple of times to prevent air from leaking out as you stretch it over the bottle top. 2.4 Set your hovercraft on the floor. Carefully pull up on the bottle top and watch your hovercraft glide across the floor. That’s it! Tip 1: Vary the height of the bottle top to control the airflow from the balloon. Tip 2: Gently tap the balloon to help guide it in the right direction. The following instructions are just one example of how you can decorate your hovercraft to give it a haunted vibe. 3.1 Attach two Instant Tacky Sticky Dots to the CD to hold the glow-in-the-dark bracelet in place. 3.2 Press the glow-in-the-dark bracelet on the sticky dot adhesive. 3.3 Blow up the balloon again, twist the end a couple of times, and reattach it to the bottle top as you did before. 3.4 Draw a scary face on your balloon to transform your basic hovercraft into a haunted hovercraft. Note: As the balloon stretches, your kids may want to wrap a paper collar (made of card stock) around the neck of their balloon for support (see the example image below).TOOLS & SUPPLIES
Supplies Tools
CD Glue Gun
Balloon Permanent Markers
Push/Pull Style Bottle Top
Optional Supplies:
– Glow-in-the-dark Bracelet
– Instant Tacky Sticky Dots
Top of Post
INVESTIGATION
Hovercraft Hull

The Winner
Investigation Results
Hovercraft Airflow
Hovercraft Balloon

The Winner
Investigation Results
Top of Tab
Top of Post
INSTRUCTIONS
Step 1: Tools & Supplies

Step 2: Build
Step 3: Decorate

Top of Tab
Top of Post