Note: Our Intro to Scratch Programming Mystery (Part 1) is based on Scratch 2.0 and is now outdated. We recommend you check out our Scratch 3.0 Redesign Mystery if you’d like to see what’s new, and then you can head over to our Scratch 3.0 Coding Camp where your kids can earn badges as they work their way through our different programming tutorials.
Visual programming is a great way to introduce your kids to the world of programming. It allows your kids to code graphically, by using existing code blocks that snap into place, while learning the fundamentals involved.
Our current investigation is focused on the Scratch programming language created by the MIT Media Lab. It lets your kids create their own interactive stories, animation, games, music, and art. It was originally designed for kids ages 8 – 16 but it’s now used by people of all ages.
We prefer Scratch over other visual programming languages that we researched for several reasons. It’s a free, online program so there’s no need to purchase or download software. There’s a lot of room for growth as a Scratch programmer so your kids will continue to be challenged until they are ready for a more textually based language. The Scratch online community allows your kids to share projects online with others. Not only will your kids be able to share their own projects, but they will have access to millions of Scratch projects shared from around the world. The ‘see inside’ feature is especially useful. Your kids will be able to see how their favorite online projects were designed and coded. Last, but not least, you can now purchase programmable robot kits that work with Scratch style programming.
Let’s start with a quick overview of Scratch with the following three tabs. The Scratch Editor is where your kids will do the actual programming. The Paint Editor is a nice feature included with Scratch that allows your kids to alter and design sprites and backdrops of their own. The Troubleshooting tab contains several common problems kids tend to run into when they first start programming in Scratch.
Once your kids are ready to start programming we have included a First Scripts section below the overview tabs. After your kids are comfortable programming their first scripts you should check out The Case of the Scratch Programming Mystery (Part II) where we help you guide your kids through the process to design and program their first games.
Scratch Editor

1. The Stage is the background of your project. The Stage can have scripts, backdrops, and sounds like a sprite but there are a few restrictions. For example, the stage does not have motion or size blocks.
Note: The Stage will always be the back layer – No sprites can move behind the Stage.
2. A Sprite is an object in your project controlled by your scripts. Sprites can be created by you, uploaded from your computer, or found in the Sprite Library.
3. The Sprite List is where you will find an image for all the sprites in your project. The name of each Sprite appears below the image. When selected, the image will appear highlighted and click on the blue info (i) icon to expand the Sprite details. This is where you can change its name, rotation style, and other information.
4. A Script is created by combining a group of interlocking blocks together. The order of the blocks is very important as this is what controls your sprite.
Note: You can have more than one script for each sprite in your project.
5. The Scripts Area contains three tabs which you will use to add scripts, costumes, and sounds to your sprites.
6. The Block Palette is where you will find the blocks used to control your sprites. Blocks are dragged from the palette to the Sprite Area as needed. There are Motion, Looks, Sound, Pen, Data, Events, Control, Sensing, Operators and More blocks. These blocks are color-coded, so you should have no trouble finding the right category as you work on the sample scripts later in this manual.
Note: All scripts must start with a Hat block to run, which are the blocks with the curved top area resembling a hat.
7. The Menu Bar supplies you with easy access to commands that you will use often while creating your projects.
8. The Duplicate Button creates an identical copy of the selected sprite or script.
9. The Delete Button deletes the selected sprite or script.
10. The Grow Button increases the size of your sprite. Click on the grow button and then click on the sprite that you want to increase in size.
11. The Shrink Button decreases the size of your sprite. Click on the Shrink Button and then click on the sprite that you want to decrease in size.
Paint Editor

The Scratch Paint Editor is a built-in image editor. You can use it to create your own sprites, costumes, and backdrops. The editor can be converted between bitmap and vector mode. The tools available for each mode are slightly different and are described below for reference. The bitmap editor is easier to use and creates pixel style images. The vector editor creates a smoother image and allows you to bend or curve your lines and images.
General Tools:
1. The Undo Button is used to remove the last action completed.
2. The Redo Button is used to add back the last action removed with the undo button.
3. The Clear Button is used to clear the canvas of current work.
4. The Add Button is used to import images from the built-in Scratch library without the need to create a new costume.
5. The Import Button is used to import your own image directly into a costume.
6. The Flip Left-Right Button is used to make a reverse image of your costume.
7. The Flip Up-Down Button is used to make an upside-down image of your costume.
8. The Set Costume Center Button is used to change the center of your costume. This center is where the costume rotates. Click on the set costume center button, click on the canvas and drag the cursor until the two intersecting lines connect where you want the center to be.
Note: Pay careful attention to the Costume Center button. Many sprite collision problems can be fixed by adjusting the center of the costume.
Bitmap Tools:
1. The Brush Tool is used to draw wherever your mouse is clicked. Change the size of your brush with the line width slider located at the bottom left corner of the editor. Change the color of your brush by using the color palette located at the bottom center of the editor.
2. The Line Tool is used to draw straight lines. Use the Shift key with the line tool to create vertical and horizontal lines.
3. The Rectangle Tool is used to draw rectangles and squares. While the rectangle tool is selected, the editor will show two buttons at the bottom left corner. These buttons allow you to draw a solid rectangle or just its outline. Use the shift key with the rectangle tool to draw a perfect square.
4. The Ellipse (Oval) Tool is used for drawing ovals and circles. While the ellipse tool is selected, the editor will show two buttons at the bottom left corner. Like the rectangle tool, these buttons allow you to draw a solid oval or just its outline. Use the shift key with the ellipse tool to draw a perfect circle.
5. The Text Tool is used to add text to your costume or backdrop. Click on the canvas to get the cursor to appear and begin typing. Change the font and size of your text as desired.
6. The Fill with Color Tool is used to fill any closed area with a color chosen from the color palette located at the bottom center of the editor. While the fill with color tool is selected, the editor will show 4 colored buttons at the bottom left corner. Use these buttons to change the gradient (gradual change of color) of the area you wish to fill. Have fun playing with the different options.
7. The Erase Tool is used to erase the chosen area of your costume or backdrop. Click on the canvas to get the cursor to appear and watch colors disappear.
8. The Select Tool is used to select an area of your costume or backdrop. Click on the canvas, drag the cursor and see a dotted box appear around the required area. Use the small square measurement boxes on that box to stretch or shrink the area or click on the center circle to move the area to a new location.
9. The Remove Background Tool is used to select the area of an image you would like to keep removing everything else. This is also known as a Magic Wand.
10. The Select and Duplicate Tool is used like the select tool only the selected area is immediately duplicated. Just use the small center circle to move the duplicate to a new location.
Vector Tools:
1. The Select (Mouse Pointer) Tool is used to stretch, shrink, rotate or change the location of an object. When you select the object an orange box will appear around it for you to manipulate like the bitmap editor’s select tool.
2. The Reshape Tool is used to bend or change the shape of the object by grabbing points with the mouse and moving them. Click on the object to see several small circles appear. Click and drag these circles to change the shape of the selected object.
3. The Pencil Tool acts very similar to the bitmap editor’s brush tool and will draw where ever the mouse is clicked. Hold down and drag the mouse to draw your line. Release the mouse to see a small circle appear at the end of the line drawn. Start your new line here to connect your new line to the one just finished. Change the color and size of the line the same way you did for the bitmap brush tool.
4. The Line Tool is used to draw a straight line like the bitmap editor’s line tool. Once drawn, use the reshape tool to bend or curve the line. Draw a straight line, select the reshape tool, click and drag anywhere on the line to bend the line or shift-click anywhere on the line to curve the line.
5. The Rectangle, Ellipse (Oval), and Text Tools work the same as with the bitmap editor.
6. The Color a Shape Tool is like the bitmap editor’s fill with color tool but is used to fill in vector objects or their outlines only. It cannot fill in a region like a whole backdrop color.
7. The Duplicate Tool is like the bitmap editor’s select and duplicate tool, but you can duplicate several copies of the selected object while holding the shift key.
Troubleshooting
![]() My sprite is moving upside down
My sprite is moving upside down
You can set the rotation style of your sprite two ways. Click on the blue info (i) icon at the top left corner of your sprite located in the Sprite List to change the rotation style property or use the ‘set rotation style’ Motion block within the sprite’s script.
![]() My sprite is missing
My sprite is missing
There could be any number of reasons for a sprite to be missing but several common reasons beginners run into are:
» The sprite’s x and y values are outside of the display screen. The ‘go to x: y:’ Motion block under the scripts tab shows the current values and is a good place to check for this problem.
Note: Since the sprite will stay at its current location when the script stops it’s a good habit to use the ‘go to x: y:’ Motion block at the beginning of the script so the sprite starts in the same location each time your program is run.
» The costume center value is no longer centered on the actual sprite causing part of the sprite to be off-screen. Use the set costume center button in the paint editor to check the center and change if necessary.
» The stage (backdrop) is the project’s background and is designed to never cover up a sprite. Unfortunately, new students tend to create their backdrop as a sprite instead of clicking on the stage icon causing it to cover up everything else.
» The sprite is hidden behind another sprite and is blocked by the larger sprite. There is a ‘go to front’ block and a ‘go back 1 layer’ block in the Looks block category that you can add to a script if necessary.
![]() My sprite should be in front of the other sprite
My sprite should be in front of the other sprite
Use the ‘go to front’ block or ‘go back 1 layer’ block from the Looks block category.
![]() My score doesn’t reset with a new game
My score doesn’t reset with a new game
Scratch programs do not reset themselves. You must reset these values yourself when your program first starts. Variables can be reset to their original values with the ‘set variable to 0’ Data block and sprite positions can be reset to their original location with the ‘go to x: y: ‘Motion block.
![]() My sprite doesn’t recognize it when it touches the other sprite
My sprite doesn’t recognize it when it touches the other sprite
The costume center value is no longer centered on the actual sprite, so the touch block is looking in the wrong area. Use the set costume center button in the paint editor to check the center and change if necessary.
Programming (often referred to as coding) can be extremely fun. As your kids create their projects they will learn about the logic needed to create fun games, animation and more.
No two kids will program the same but there are several programming practices that they should follow:
1. Make sure your kids save their projects OFTEN! You don’t want them to be the victim of a power failure, a frozen computer, or an accidental exiting of the Scratch site before they save.
2. Make sure your kids give their sprites names. I know I’ve mentioned this before but it’s very important to give meaningful names to their projects, sprites, and even variables. Just think of how much easier it will be to review a project with them when the names are descriptive.
3. Have your kids use variables for values they use multiple times in a project. For example, their game has a high score value of 50 that is checked in several locations. What happens when they want a high score of 100 instead? Or what if they’d rather test their project with a high score of 10 to save time? It will be easier for them to change this value once with the high score variable instead of changing it in every script that uses this value.
Note: See ‘How to Keep Score’ in the First Scripts section below to learn how to create a variable.
4. Teach your kids to clean up their programs. Once they’ve finished with a project it’s always a good idea to go back and see if they can simplify anything and remove unused scripts.
5. Help your kids get in the habit of testing their programs. Even better, have them enlist the help of their friends to be their testers. Their friends will have fun and may become interested in learning Scratch too.
In the First Scripts tab below, we will walk through the first couple of scripts together while your kids get comfortable with how scripts are built and then they should be able to program the rest on their own. Each Block Category is color-coded, so it shouldn’t take long for them to get used to which blocks can be found where.
Note: Be sure your kids save each script for future reference. The more projects your kids code, the larger their library of reusable scripts will be.
First Scripts
Change the Color of Your Sprite
Make Your Sprite Talk
Move Your Sprite to a Beat
Use Keys to Move Your Sprite
Make Your Sprite Follow the Mouse
Glide Your Sprite around the Stage
Make Your Sprite Whirl Using the Mouse
Move Your Animated Sprite
Animate Your Sprite
How to Keep Score
Change the Color of Your Sprite
1. Go to https://scratch.mit.edu/ and sign in or create a new Scratch account.
Note: You don’t need to have an account to use the Scratch editor, but you do need one to share your projects with the online community. If you don’t want to create an account at this time, you can upload and download files on your computer from the File menu option.
2. Select the Create tab.
3. All new projects start with the Scratch character as the sprite, but we want to change it to something different. Right-click on the Scratch sprite and select delete.
4. Find the ‘New sprite’ section of the editor and select the ‘Choose sprite from library’ option. Choose any sprite you’d like to change colors with.
5. All scripts should start with a Hat block as they trigger your scripts to run when they sense the corresponding event.
The Events blocks category has most of the Hat blocks and is brown, but you can also find them in the Control blocks or More blocks category. Go to the Scripts tab located near the top center of the editor and drag the ‘when this sprite clicked’ Hat block from the Blocks Palette to the Scripts Area.
6. Next, we need to tell the new sprite to change its color. Change color is in the Looks category which is purple. Drag the ‘change color effect by 25’ block to the Scripts Area and connect it below the Events block from the previous step.
7. Now click on your sprite! What happens? You should see your sprite change color each time you click your sprite with the mouse.
8. What if you want to change the color of two sprites at the same time? How would you click in two spots at once? Swap the ‘when this sprite clicked’ Hat block with the ‘when space key pressed’ Hat block, right click on your sprite and select duplicate so you have two sprites. Watch their colors change each time you press the spacebar.
Note: Look at the script for both sprites. Notice that not only did the sprite get duplicated but all scripts associated with it did too.
9. Take a closer look at the ‘change color effect by 25’ block. Click on the down arrow next to the word color to see additional effect options.
10. Your script and sprite should look similar to this:
![]()
Challenge: Play around with the different effects from the available menu!
Make Your Sprite Talk
1. Remember to save your first script and create a new project (‘File -> New’ option).
2. Since the Scratch sprite is already there you can use him or choose a new one from the Sprite Library.
3. Remember, you need one of the Hat blocks first. Go back to the Scripts tab and drag the ‘when this sprite clicked’ Hat block from the Blocks Palette to the Scripts Area.
4. Next, we need to make our sprite talk. There are several talking blocks which are found in the Looks category. Drag the ‘Say Hello! for 2 secs’ block to the Scripts Area and connect it below the Events block from the previous step.
5. Now click on your sprite! What happens? You should see a speech bubble appear next to your sprite with the phrase “Hello!” for two seconds before it disappears.
6. Play around with the different methods of having your sprite talk. You can change how long the speech bubble is visible or even have it stay forever.
7. Your script and sprite should look similar to this:
![]()
Challenge: Have two sprites talk to each other!
Move Your Sprite to a Beat
1. This script will make use of the ‘forever’ Control block. This block is very important because you will need it every time you want to run continuous actions.
Note: The ‘forever’ block creates a loop like the repeat blocks except the script will loop forever, not until the specified condition occurs.
2. Choose an animal or person from the Sprite Library and find the corresponding blocks from the Block Palette to match the script below. Your script and sprite should look similar to this:

Challenge: Change the instruments and change the steps to your dance!
Use Keys to Move Your Sprite
1. Choose an animal or person from the Sprite Library and find the corresponding blocks from the Block Palette to match the script below.
2. The ‘when space key pressed’ block can be switched to other keys as well. Play around with this block to see the other key options.
3. Your script and sprite should look similar to this:
![]()
Challenge: Make your sprite move using all four arrow keys (up, down, left, and right)!
Make Your Sprite Follow the Mouse
1. Choose an animal or person from the Sprite Library and find the corresponding blocks from the Block Palette to match the script below.
2. Don’t forget that without the ‘forever’ Control block your script would point to the mouse-pointer and move 3 steps just once. Your script and sprite should look similar to this:

Challenge: Make your sprite move faster as it follows the mouse!
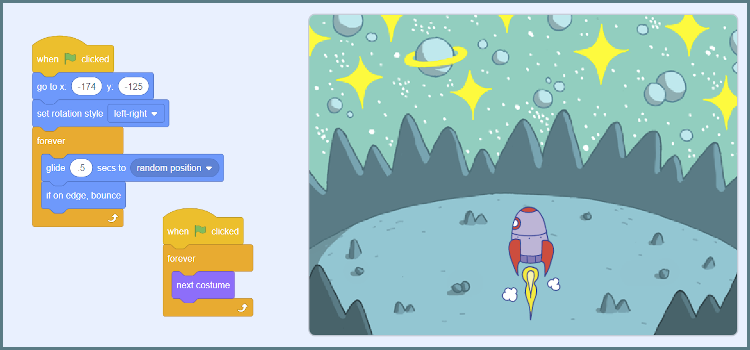
Glide Your Sprite around the Stage
1. Choose an animal or person from the Sprite Library.
2. Click on the Motion blocks category. If you move your current sprite around while this category is visible you will notice the x and y coordinate values update with the sprite’s current position.
3. As you build your script, move your sprite to its next glide position before dragging the ‘glide’ block into your script. This allows the editor to set the x and y coordinates for you.
4. Your script and sprite should look similar to this:
![]()
Challenge: Make your sprite glide continuously!
Make Your Sprite Whirl Using the Mouse
1. Choose an animal or person from the Sprite Library and find the corresponding blocks from the Block Palette to match the script below. Your script and sprite should look similar to this:
![]()
Challenge: What other effects can you have fun with on your sprite?
Move Your Animated Sprite
1. Choose the Parrot sprite from the Sprite Library.
2. Go to the Costumes tab near the top center of the editor. Notice that the parrot sprite has two costumes, one with the wings up and one with the wings down. There are several sprites in the Sprite Library that supply you with multiple costumes.
3. Find the corresponding blocks from the Block Palette to match the script below, dragging them to the Scripts Area. Your script and sprite should look similar to this:
![]()
Note: When the parrot reaches the edge of the stage you will notice that it flies upside down after it bounces off the edge. Switch the rotation style from full rotation to left-right rotation.
You can change the rotation style in the information dialog box when you right click on the parrot and select the info option or if you click on the sprite’s blue info (i) icon from the Sprite List. You can also change the rotation style in a script using the ‘set rotation style’ Motion block.
![]()
Challenge: Make your parrot fly higher or lower as its flying across the stage!
Animate Your Sprite
This time we will change costumes using a method that is helpful when you need to switch between costumes that are not in sequential order (see the sprite’s costume tab to see the costumes, their names, and their order).
1. Choose the Penquin2 Talk sprite from the Sprite Library and find the corresponding blocks from the Block Palette to match the script below. Your script and sprite should look similar to this:
Note: Notice the wait blocks between each costume change. Play around with the wait time until your animation moves at the speed you prefer.
Challenge: Use the paint editor to close the beak on the first penguin costume to make his mouth open and close like he’s talking!
How to Keep Score
Note: This script is going to make use of something called a variable. A variable is a storage container used to store a SINGLE value. When you add a new value into this container you will lose the old one.
It’s very important to give your variable a meaningful name. In the script below we name the variable ‘Score’ because we need to store our score there. A name such as Variable 1 would not be very helpful later.
1. Choose the Shark and Fish2 sprites from the Sprite Library.
2. Select the Shark in the Sprite List so you can change to costume 2 which has the shark’s mouth open.
3. Select the Fish sprite in the Sprite List so you can shrink the fish to fit in the shark’s mouth.
4. Go to the Data category on the Blocks Palette and select ‘Make a Variable’. Name the variable Score and make sure the ‘For all sprites’ option is selected so all sprites have access to this variable (See the appendix for additional information on variables).
Note: You should see the Scoreboard in the top left corner of your stage. This can be hidden in future scripts as needed by unchecking the variable name under the Data category tab.
5. Select the Shark in the Sprite List again and find the corresponding blocks from the Block Palette to match the script below, dragging them to the Scripts Area. Your Shark script and sprite should look similar to this:

Challenge: Add a script to the Fish sprite to make it move too, then add the blocks needed to keep both sprites on the screen.
Challenge Solutions
We hope your kids enjoyed the challenges found at the end of each of the script tutorials in the First Scripts tab. We’ve included solutions to those challenges here in case they’re needed.
Change the Color of Your Sprite Challenge
Play around with the different effects from the available menu:
![]()
Make Your Sprite Talk Challenge
Have two sprites talk to each other:
![]()
Move Your Sprite to a Beat Challenge
Change the instruments and change the steps to your dance:

Use Keys to Move Your Sprite Challenge
Make your sprite move using all four arrow keys (up, down, left, and right):
![]()
Make Your Sprite Follow the Mouse Challenge
Make your sprite move faster as it follows the mouse:

Glide Your Sprite Around the Stage Challenge
Make your sprite glide continuously:
![]()
Make your Sprite Whirl Using the Mouse Challenge
What other effects can you have fun with on your sprite:
![]()
Move Your Animated Sprite Challenge
Make your parrot fly higher or lower as its flying across the stage:
![]()
Note: The ‘if on edge, bounce’ Motion block doesn’t work for this situation. Create variables to represent the number of steps you want to move the x and y positions, so they can be multiplied by -1 each time an edge is touched. This allows us to easily change the direction we’re moving across the screen.
Animate Your Sprite Challenge
Use the paint editor to close the beak on the first penguin costume to make his mouth open and close like he’s talking:
![]()
How to Keep Score Challenge
Add a script to the Fish sprite to make it move too, then add the blocks needed to keep both sprites on the screen.
