A Homopolar Motor Investigation
Homopolar Motor Printable Instructions
Homopolar Motor Safety Warnings
Neodymium magnets are rare earth magnets that are incredibly strong and hazardous to young kids and pets. If you’re building your homopolar motor with younger kids around, make sure they never put the magnets in their mouths.
As you build your homopolar motor, do not leave the battery and magnet attached to the copper wire unattended. The battery and copper wire can get extremely hot when running continuously.
Note: This activity can be a great learning experience for your kids when you proceed with caution.
What Is a Homopolar Motor
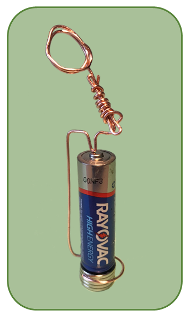
The homopolar motor is a simple, direct current (DC) electric motor. This motor was the first electric motor ever built and it was designed by the British scientist, Michael Faraday, in 1821. This motor’s simplicity makes it an ideal learning tool to introduce your kids to magnetic fields and electric motors.
You can’t deny the fascination kids have watching magnets snap together or push apart, as if by magic. This invisible force, called magnetism, can be a lot of fun to experiment with but remember to maintain adult supervision. We’ve seen more than one finger get pinched when these magnets snap together as they get close to each other. Too many snaps like this can also cause the neodymium magnets to chip and break.
During our investigation, we found that letting kids experiment with regular magnets first was quite beneficial. Whether your kids simply have fun repelling magnets across the table or attach them to small, lightweight toy cars – to watch one car repel the other – their imaginations can run wild without damaging the neodymium magnets needed for the homopolar motor.
In the first set of tabs below, we have a brief tutorial on how magnets work and some STEM questions for your kids to investigate.
Next, we explain How the Homopolar Motor Works before our last set of tabs on How to Build the Homopolar Motor.
Experimenting with Magnets
How Magnets Work

» Magnets have two ends known as poles, the north pole (N) and the south pole (S).
» The north pole of the magnet is commonly colored red; the south pole is commonly colored blue (see images above).
Note: The red tip of a compass needle is its north pole.
» Do opposites attract? They do with magnets – opposite poles attract and like poles repel. The north pole of one magnet will attract the south pole of another magnet. It will also repel the other magnet’s north pole (see the Magnetic Poles image above).
» The magnetic field is an invisible area of magnetism surrounding the magnet (see the Magnetic Field image above).
» Magnets will only stick to strong metals like iron and cobalt. Weaker metals such as brass and copper will not stick to a magnet.
Magnet STEM Questions
STEM Questions Your Kids Can Investigate
The following questions can be used to work on your kids’ critical thinking and problem-solving skills, especially if they have a chance to collaborate with friends, siblings, or classmates.
Q: How can you tell which end of a magnet is the north pole and which end is the south pole if it’s an unmarked magnet?
During our investigation, we discovered that the north pole of a magnet is commonly colored red, and the south pole is commonly colored blue. What if your kids’ magnets aren’t colored? Using the information from our How Magnets Work tutorial, help your kids use their critical thinking skills to determine which pole is north and which pole is south.
Solution 1: Opposite poles attract and like poles repel – your kids can use an already marked magnet to attract or repel the two ends of the unmarked magnet.
Solution 2: Your kids can use a magnetic compass to determine which end of their unmarked magnet is the north pole. As we mentioned in our How Magnets Work tutorial, the red tip of a compass needle is its north pole.
Have your kids place the compass close to their unmarked magnet, without touching it. They should notice that the point of the compass needle will point to the south pole of their magnet because opposite poles attract.
Q: Would a magnet make a good metal detector?
Solution: A metal detector can detect both strong and weak metals, but a magnet will only stick to the stronger ones.
Help your kids gather several samples of metal, both hard and soft, from around the house. After testing the different metals, your kid’s investigation should determine that a magnet will not make a very good metal detector because it will only detect hard metals.
Q: Will liquid have an impact on a magnet’s magnetic field?
In the previous investigation, your kids were able to determine that not all types of metal stick to a magnet. In this investigation your kids will want to be sure to only use those hard metal objects, like paper clips, to test whether liquids have an impact on a magnet’s magnetic field.
Solution: Help your kids through the following process:
1. Partially fill several glasses with different liquids.
Note: For maximum benefit, have your kids include liquids of different thicknesses without telling them why.
2. Place several small, identical metal objects of their choice at the bottom of each glass.
Note: We chose paper clips because they’re lightweight, inexpensive, and easy to find around the house.
3. Test how the metal objects interact with the magnet outside of any liquid first. They should observe how close the magnet needs to be before the metal objects start to move toward the magnet.
4. Place the magnet up against each glass and observe how the metal objects, at the bottom of each glass, react to the magnet.
Regardless of the liquid, your kids should observe that the metal objects will be attracted to the magnet. They should also observe that the thicker liquids can cause some resistance in this movement, depending on the liquid’s consistency, but that the objects are still attracted to the magnet.
How the Homopolar Motor Works

» The AAA battery attached to the neodymium magnet creates a magnetic field around the battery (B).
» The positive terminal of the battery, connected to the neodymium magnet with the bare copper wire, creates an electric circuit. The current (I) flowing through the circuit creates a second magnetic field.
» The interaction of these two magnetic fields causes force (F) to be exerted perpendicular to the direction of these two magnetic fields, forcing the copper wire to rotate in a constant circular motion. This conversion of electrical energy into mechanical energy is known as the Lorentz force.
How to Build the Homopolar Motor
Supplies
SUPPLIES
| Materials | Tools |
|---|---|
| Copper Wire | Wire Cutters |
| Magnets | Pliers |
| Battery | |
| Brass Washers | |
| Adhesive | |
We were able to build our homopolar motor for under $2.00. The cost varies depending on how many motors you make, and which supplies you can buy in larger quantities.
Investigation
BARE COPPER WIRE
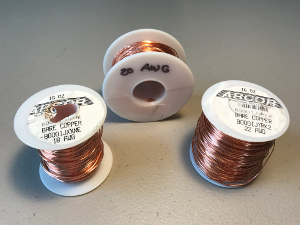
The copper contraption that you create to connect the positive terminal of your battery to the neodymium magnet(s) must be made with bare copper wire. We tested 18 AWG, 20 AWG, and 22 AWG bare copper wire to see which wire was easiest to work with while keeping its ability to continually rotate around the magnets.
Note: The copper contraption that you’re building in this project is technically known as an armature.
THE WINNER
A 195-foot spool of 18 AWG bare copper wire from Amazon.
INVESTIGATIVE RESULTS
First, the AWG (American wire gauge) value represents the diameter of the wire. The smaller the AWG value, the thicker the wire. For example, the 18 AWG wire we tested was the thickest of the three sizes we used in our investigation.
Second, the 18 AWG wire held its shape better than the two thinner wires that were tested. This size was a little harder to work with as we were forming the magnifying glass at the top of our copper contraption, but it was this rigidity that was a plus in the end. The rigidity helped keep the copper contraption in contact with the magnets while rotating.
Third, we found the 20 AWG and 22 AWG wires easier to bend but this was also their ultimate downfall. The flexibility made it difficult to keep the copper contraption properly connected to the neodymium magnets due to the contraption consistently bending under its weight.
NEODYMIUM MAGNETS
Homopolar Motor Safety Warnings:
Neodymium magnets are rare earth magnets that are incredibly strong and hazardous to young kids and pets. If you’re building your homopolar motor with younger kids around, make sure they never put the magnets in their mouths.
As you build your homopolar motor, do not leave the battery and magnet attached to the copper wire unattended. The battery and copper wire can get extremely hot when running continuously.
Note: This activity can be a great learning experience for your kids if you follow these safety warnings.
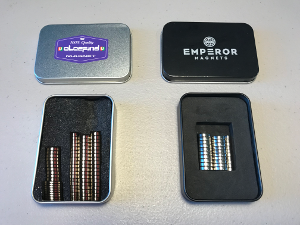
We purchased our neodymium magnets in a variety of sizes, from two different companies off Amazon, and we were very pleased with both brands shown above. We saw additional options available but these magnets were clearly labeled as neodymium magnets.
There are several websites available online that sell a larger selection of neodymium magnets. Unfortunately, we don’t know enough about any of them to make a recommendation. If you do try one of these other sites, be sure to read some reviews first.
THE WINNER
The 15 mm neodymium magnets with AA batteries.
INVESTIGATIVE RESULTS
First, neodymium magnets will chip and/or shatter when allowed to repetitively collide with each other, especially with high force.
Second, we made several searches on Amazon throughout this investigation and the options available changed frequently. If 15 mm neodymium magnets aren’t available, you can use 12 mm neodymium magnets with AAA batteries instead.
As long as your magnet is slightly larger than your battery, you should be fine. We preferred the AA batteries because the slightly larger size made the copper contraption construction easier.
BATTERY
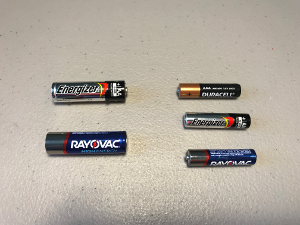
We built our copper contraption design in two sizes, one to test on AA batteries and one to test on AAA batteries.
THE WINNER
The best-priced AA battery you can find.
If you want to buy your batteries in bulk, we recommend you check on Amazon. You can also take advantage of coupons at your local stores.
INVESTIGATIVE RESULTS
First, the current flowing through your homopolar motor causes your copper contraption and battery to get extremely hot.
Second, your homopolar motor can use up battery life within minutes. That’s why we bought our batteries in bulk and with coupons.
Duracell batteries may have lasted longer in our sample tests but not enough under these conditions to warrant a higher cost.
WASHERS/ADHESIVE
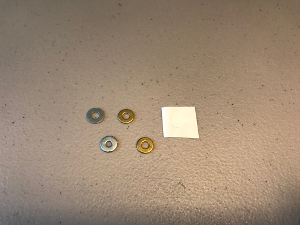
During our investigation, we built our homopolar motors with and without washers. We were able to keep our contraptions rotating longer when we used the washers as a guide to keep the V-shaped section on the battery’s positive terminal.
We chose to use an Instant Tacky Sticky Dot due to our previous experience with this adhesive. These Sticky Dots adhere well to metal and they’re easy to tear into smaller pieces.
Instructions
Homopolar Motor Printable Instructions
These instructions will take you through the step-by-step process required to build your very own spinning copper contraption (a.k.a. homopolar motor). We had a lot of fun, and some failures, during our homopolar motor investigation, but if you follow these instructions you should have your homopolar motor working in no time.
Note: The homopolar motor is a fascinating project to try with your kids, but it’s also a project that can be a little frustrating for them. Double-check our troubleshooting tips below if your kid’s homopolar motor doesn’t want to continuously rotate.
Step 1: Supplies
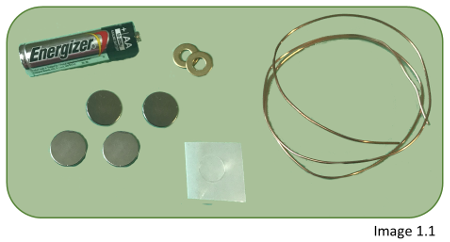
1.1 We made our homopolar motor using an AA battery with 15 mm neodymium magnets. If you have trouble finding 15 mm neodymium magnets, use a AAA battery with 12 mm neodymium magnets instead. During our investigation, we found that the AA battery was just enough bigger to make the construction of our homopolar motor less stressful.
1.2 Designing our copper contraptions was quite a bit of fun but we couldn’t seem to get any of them to stay on the battery’s positive terminal. We were able to solve this dilemma by using an Instant Tacky sticky dot to attach two brass washers over the terminal. This created a band around the terminal that acted as a guide for our contraptions.
Note: You need to make sure the washers just fit over the battery’s positive terminal. If the washer’s center hole is too wide, the copper contraption could get jammed between the washer and the terminal.
1.3 The amount of bare copper wire needed to build your spinning contraption will vary, depending on your kid’s design. We used about 18 inches for our magnifying glass contraption.
Step 2: Testing

2.1 If you haven’t already done so, be sure to test your battery. The homopolar motor often requires some tweaking, in the end, to get the copper contraption working so it’s best to know from the start that the battery isn’t the problem.
Note: The homopolar motor will drain your batteries rather quickly. If you don’t already own a multimeter, now is the perfect time to add one to your home/classroom maker space.
Step 3: Assembly
If you recall from our How the Homopolar Motor Works tutorial, the positive terminal of your battery needs to be connected to your neodymium magnet(s) with bare copper wire. We chose a compact design for our copper contraption for its stability. This design will also allow your kids to get inventive and add a personal touch to the top of their contraption (Image 3.3).

3.1 During our investigation we found it easier to build the copper contraption (Image 3.3) after we assembled the rest of the parts. This allowed us to double-check our measurements as needed.
3.2 Place the negative end of the AA battery on top of your magnets (Image 3.1, step 1).
Note: You shouldn’t need as many magnets as you see in Image 3.1. We had a lot of success with just three magnets stacked together. Fewer than three magnets didn’t give us enough wiggle room if we had to adjust the arm and/or ring of our contraption to obtain the best contact with the magnets.
3.3 Use a small piece of adhesive to attach your brass washers around the battery’s positive terminal (Image 3.1, step 2).
Note: As mentioned earlier, the brass washers aren’t mandatory, but we found our copper contraption tended to slip off the positive terminal without them.
3.4 It’s now time for your kids to get their creative juices flowing. Feel free to follow the rest of these instructions step by step or use this information as a guideline if your kids already have their own ideas.
Note: We did some brainstorming during our investigation to see if we could make this next section easier for teachers who want to attempt this project with a larger group of kids. The wooden dowel template in Image 3.2 is just one way of helping your students build their contraption with precise measurements.
3.5 Wrap one end of your copper wire around a wooden dowel until it’s wrapped almost all the way around (Image 3.2, step 1).
Note: For our 15 mm neodymium magnets, a 5/8″ wooden dowel was a perfect size. You can also have your kids wrap the copper wire around the magnets themselves, but we found it hard to get a nice fit this way.
3.6 Use pliers to make a 90-degree bend upward in the wire just before the wire wraps completely around the dowel in the previous step (Image 3.2, step 2).
3.7 Calculate how tall the arm of your contraption needs to be (Image 3.2, step 3). This measurement should include the distance from where the wire wraps around the magnets up to the bottom of your battery, the height of the battery (including the terminal), plus an additional quarter inch for the section that hovers over the battery terminal (Image 3.2, step 3).
3.8 Make another 90-degree bend in the copper wire, bending inward this time (Image 3.2, step 4).
3.9 This next section can be difficult to measure which is why we liked creating the wooden dowel template.
After creating the 90-degree bend inward in the previous step, you need to create the section that hovers over the battery’s positive terminal. This section needs a 1/4″ V bent into the wire so that the V will touch the battery’s positive terminal (Image 3.2, step 5) leaving an equal length of wire on each side.
3.10. Make one last bend up and inward so that whatever design your kids decide to create will balance above the battery (Image 3.2, step 6).
3.11 Your kids can now bend the rest of the copper wire into any design they’d like and remove any extra length.
Note: Your kids may need help centering this top section over the battery.
Step 4: Troubleshooting Tips
Helping your kids build their homopolar motor shouldn’t take long. Helping them adjust the motor so it will continuously rotate might. Hopefully, these tips will help your kids get their homopolar motor spinning in no time.
1. If you haven’t already done so, make sure your kids are using a working battery.
2. Make sure your kid’s copper contraption is making enough contact with their magnet(s). Both sides of the copper ring that circles the magnet(s) should have some contact with the magnet(s).
3. If after making sure the above two issues aren’t a problem, help your kids adjust the arm of their copper contraption. The arm is the section of wire that runs up the side of the battery and this adjustment was the one that helped us the most. Just a slight bend halfway up the arm seemed to help with the weight distribution so the ring at the bottom stayed connected to the magnets.