Halloween LED Throwies Printable Instructions
Go Straight to the Halloween LED Throwies Step-by-Step Instructions
SAFETY WARNINGS:
Neodymium magnets are rare earth magnets that are incredibly strong and hazardous to young kids and pets.
There have been multiple reports of life-threatening injuries to children who have swallowed coin cell batteries. Experts have explained that this is the result of the current in the battery causing a chemical reaction, leading to burns in the esophagus.
Please keep all coin cell batteries and other small parts used in this activity away from young children.
Okay, we confess, we love it when kids get excited over one of our STEM projects. This Halloween, watch your kids get excited as they create Halloween LED Throwies. They’re easy to make, easy on your wallet, and big on the WOW factor.
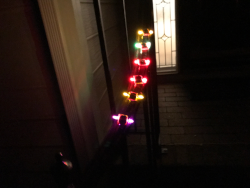
The Grafitti Research Lab in New York City invented LED Throwies in 2006 to use as non-destructive graffiti. Whether your kids choose to create LED graffiti art or use their Halloween LED Throwies in a game of Haunted Throwies Yard Darts, all you need for this project are two LEDs, a coin cell battery, a neodymium magnet, and some electrical tape in your kid’s favorite Halloween color for each Throwie they build.
Click here for Grafitti Research Lab’s Wikipedia page.

Note: Turn glow-in-the-dark necklaces into hoops for a late-night game of Haunted Throwies Yard Darts.
The Science Behind Halloween LED Throwies
MAGNET FUN FACTS & STEM QUESTIONS
We first talked about magnets and how they work when we used Neodymium magnets, copper wire, and AA batteries to create homopolar motors. If this sounds like a project your kids would like to investigate, check out our Spinning Copper Contraption Mystery.

A magnet is an object that produces a magnetic field and attracts hard metals such as iron, nickel, and cobalt. The magnetic field’s lines of force exit from the magnet’s north pole and enter the magnet’s south pole.
Fun Facts
- Magnets have two ends known as poles, the north pole (N) and the south pole (S).
- The north pole of the magnet is commonly colored red; the south pole is commonly colored blue (see images above).
- The red tip of a compass needle is its north pole.
- Do opposites attract? They do when it comes to magnets – opposite poles attract and like poles repel. As a result, the north pole of one magnet will attract the south pole of another magnet and repel the other magnet’s north pole (see the Magnetic Poles image above).
- The magnetic field is an invisible area of magnetism surrounding the magnet (see the Magnetic Field image above).
- Magnets will only stick to strong metals like iron and cobalt. Therefore, weaker metals such as brass and copper do not stick to magnets.
STEM Questions Your Kids Can Investigate
Whether you’re a teacher or a parent, the following questions can be used to work on your kids’ critical thinking and problem-solving skills, especially if they have a chance to collaborate with friends, siblings, or classmates.
Q: How can you tell which end of a magnet is the north pole and which end is the south pole if it’s an unmarked magnet?
During our investigation, we discovered that the north pole of a magnet is commonly colored red, and the south pole is commonly colored blue. What if your kids’ magnets aren’t colored or labeled? Using the information discussed above, help your kids use their critical thinking skills to determine which pole is north and which pole is south.
Solution 1: Your kids can use an already marked magnet to attract or repel the ends of their unmarked magnet. Remind your kids that opposite poles attract and like poles repel.
Solution 2: Your kids can use a magnetic compass to determine which end of their unmarked magnet is the north pole of the magnet. As we mentioned earlier, the red tip of a compass needle is its north pole. Have your kids place the compass close to their unmarked magnet, without touching it. They should notice that the point of the compass needle will point to the South pole of their magnet because opposite poles attract.
Materials Needed: A marked magnet, an unmarked magnet, and a magnetic compass.
Q: Would a magnet make a good metal detector?
As we mentioned in the Magnet Fun Facts above, magnets will only stick to strong metals like iron and cobalt. Weaker metals such as brass and copper won’t stick to a magnet. Help your kids gather several samples of metal from around the house, making sure they include both hard and soft metals.
Solution: After testing the different metals, your kid’s investigation should determine that a magnet would not make a very good metal detector because it will only detect the hard metals.
Materials Needed: A variety of both hard and soft metals.
Q: Will liquid have an impact on a magnet’s magnetic field?
In the previous investigation, your kids were able to determine that not all types of metal stick to a magnet. Therefore, your kids will want to be sure to use a hard metal object, like a paper clip, to test whether liquids have an impact on a magnet’s magnetic field.
Help your kids:
- Partially fill several see-through containers with different liquids. To get the maximum benefit of this investigation, have your kids include liquids of different thicknesses without telling them why.
- Place several small, identical metal objects of their choice at the bottom of each glass. We chose paper clips because they’re lightweight, inexpensive, and easy to find around the house.
- Test how the metal objects interact with the magnet outside of the liquid first. They should observe how close the magnet needs to be before the metal objects start to move toward the magnet.
- Place the magnet up against each container and observe how the metal objects at the bottom of each container react to the magnet.
Solution: Regardless of the liquid, your kids should observe that the metal objects will be attracted to the magnet. They should also observe that the thicker liquids can cause some resistance in this movement, depending on the liquid’s consistency, but that the objects are still attracted to the magnet.
Materials Needed: See-through containers, various liquids, and some paper clips (or other hard metal objects).
LED FUN FACTS & STEM QUESTIONS

Fun Facts
- An LED, or light-emitting diode, is a two-lead (legged) semiconductor crystal that lights when the right amount of current passes through it in a forward direction.
- Any current flowing in the reverse direction will be blocked.
- An LED has two legs that connect to your circuit.
- The longer leg of an LED (called the anode) is positive. The shorter leg of an LED (called the cathode) is negative.
- You can also use the flat side of your LED to determine which leg is negative as it’s the leg closest to that side. Unfortunately, we had a hard time finding the flat side of our LEDs. We found the leg length characteristic easier to use.
- When connected to your circuit, the positive leg directs current to the negative leg.
- In our LED Throwie, the coin cell battery creates the circuit. The positive leg of the LED is attached to the positive side of the battery, and the negative leg is attached to the negative side of the battery.
STEM Questions Your Kids Can Investigate
Whether you’re a teacher or a parent, the following questions can be used to work on your kids’ critical thinking and problem-solving skills, especially if they have a chance to collaborate with friends, siblings, or classmates.
Q: If the legs of an LED have been trimmed during a previous experiment, how can you tell which leg is positive and which leg is negative?
We often have a bowl full of used LEDs left over from previous experiments that we re-purpose. Hand your kids a variety of re-purposed LEDs and instruct them to use their problem-solving skills and the information above to determine which LED leg is positive and which leg is negative. If you don’t have any old LEDs handy, trim the positive leg on some new LEDs to match the length of the negative leg.
Solution 1: Your kids can use a coin cell battery to determine which leg is positive, and which leg is negative. Remind your kids that polarity matters with an LED. The positive leg attaches to the positive side of the battery and the negative leg attaches to the negative side of the battery.
Solution 2: Your kids can try to use the flat side of the LED to determine which leg is positive, and which leg is negative. As we mentioned above, the leg closest to the flat side is negative, but it can be hard to find the flat area of the LED.
Materials Needed: A variety of LEDs with modified legs and a coin cell battery.
Q: Our Halloween LED throwies were designed to blink non-stop. How can your kids modify their throwies so the battery will last longer?
A switch is the part of the circuit designed to open and close a gap in the circuit’s path. When the switch closes the gap, the circuit is complete, and the electric current will flow. When the switch opens the gap though, the circuit is incomplete, and the electric current is unable to flow through.
Solution: First, your kids can create a sleeve for the battery out of a strip of card stock that is just wider than the electrical tape. Your kids should place the battery and LED legs in the sleeve before attaching the electrical tape. This will prevent the electrical tape from permanently attaching the LED legs to the battery.
Second, your kids need a smaller piece of card stock that will act as a switch. They’ll slide the smaller piece of card stock into the sleeve, going between the battery and one of the LED legs, to form a gap in the circuit. Your kids will remove the piece of card stock to close the gap and watch the LED light up.
Note: If the battery slips out of the sleeve while your kids are playing with their throwies, have them add a small piece of double-sided scotch tape to the edges of the battery. Make sure this tape isn’t placed near the LED legs.
Materials Needed: An LED, coin cell battery, optional neodymium magnet, electrical tape, and card stock.
Halloween LED Throwies
Halloween LED Throwies Printable Instructions
SUPPLY LIST
| Supplies | Tools |
|---|---|
| LED | Scissors |
| Coin Cell Battery | |
| Neodymium Magnet | |
| Electrical Tape | |
Note: The cost of this investigation will vary depending on whether you buy your materials in large or small quantities, what type of LEDs you choose, and whether you include a neodymium magnet in your kids’ throwies. Since we’re able to buy our supplies in larger quantities, we can build our throwies for under a dollar.
INVESTIGATION
SAFETY WARNINGS:
Neodymium magnets are rare earth magnets that are incredibly strong and hazardous to young kids and pets.
There have been multiple reports of life-threatening injuries to children who have swallowed coin cell batteries. Experts have explained that this is the result of the current in the battery causing a chemical reaction, leading to burns in the esophagus.
Please keep all coin cell batteries and other small parts used in this activity away from young children.
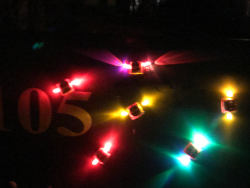
Your kids will be able to create a Halloween LED Throwie with nothing more than an LED, a coin cell battery, and some Halloween-colored electrical tape. If you’re working with older kids, and neodymium magnets are within your budget, the addition of a magnet will allow your kids’ throwies to stick on hard metal surfaces. The more throwies your kids can build and use, the more memorable this project will be for them.
LEDs & Battery

Light-emitting diodes (LEDs) come in a variety of colors and sizes. The 3mm and 5mm two-legged LEDs were tested because they’re easy to attach to the battery – no soldering required, and they’re inexpensive. As you can see, they come in red, yellow, green, blue, and white bulbs and the clear bulbs by the coin cell battery in the picture above are flashing RGB (red, green, blue) bulbs which are usually the favorite with kids.
The LED winner
The 5 mm LEDs from Amazon.
Investigation Results
First, even though the 3mm LEDs will work fine, the 5mm LEDs will be a lot more fun for your kids because of their brightness.
Second, LED polarity does matter, and the LED will only work when the positive leg is attached to the positive side of the battery and the negative leg is attached to the negative side of the battery.
Note: If the LED doesn’t light up when your kids attach it to their battery, they need to make sure the positive and negative LED legs are attached to the positive and negative sides of the battery, respectively.
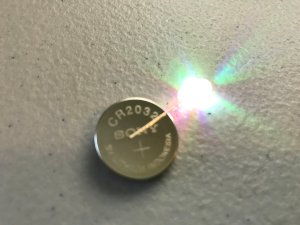
The Battery Winner
The Sony CR2032 Lithium 3V battery from Amazon.
Investigation Result
The SONY CR2032 has been our go-to battery for most projects, but due to the new warnings about coin cell batteries, we will be looking at alternative options for future projects. Unfortunately, the CR2032 is the best option for an LED Throwie. This battery can usually be found on Amazon for a much better price than at your local Walmart or Target – Be careful and read the reviews though as knock-off batteries are being sold that don’t work as promised.
Neodymium Magnets

We purchased our neodymium magnets in a variety of sizes, from two different companies off Amazon. We were very pleased with both brands shown above. There were additional options available but these two were clearly labeled as neodymium magnets.
There are several websites available online that sell a larger selection of neodymium magnets, but we don’t know enough about any of them to make any type of recommendation. If you do try one of these other sites, be sure to read the reviews. Two of the companies that were always at the top of our searches contained warnings on various review sites.
The Winner
The 15 mm neodymium magnets because they’re also the perfect size for our homopolar motor project, The Spinning Copper Contraption Mystery
Investigation Results
First, Neodymium magnets will chip and shatter when allowed to repetitively collide with each other, especially with high force.
Second, we did several searches for neodymium magnets on Amazon during this investigation and the options available seem to change frequently. If you’re unable to find any 15 mm neodymium magnets, the 12 mm neodymium magnets worked too.
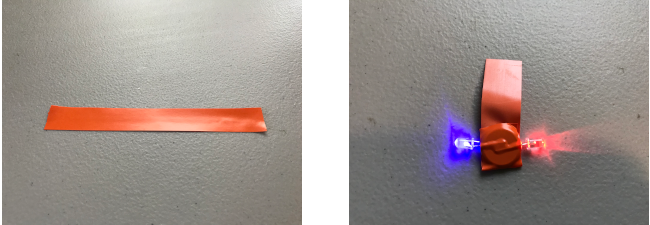
Electrical Tape

The Winner
The 3/4″ electrical tape, preferably in orange or red.
Investigation Results
If you’re trying to save money, you can find black electrical tape at your local Dollar Store. If you’re lucky and it’s not too close to Halloween, you can use a coupon at your local craft store. Otherwise, our local Lowes store had a nice variety of colors.
INSTRUCTIONS
SAFETY WARNINGS:
Neodymium magnets are rare earth magnets that are incredibly strong and hazardous to young kids and pets.
There have been multiple reports of life-threatening injuries to children who have swallowed coin cell batteries. Experts have explained that this is the result of the current in the battery causing a chemical reaction, leading to burns in the esophagus.
Please keep all coin cell batteries and other small parts used in this activity away from young children.
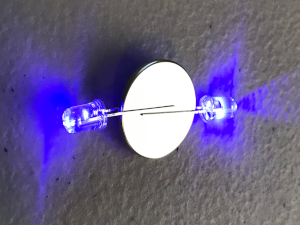
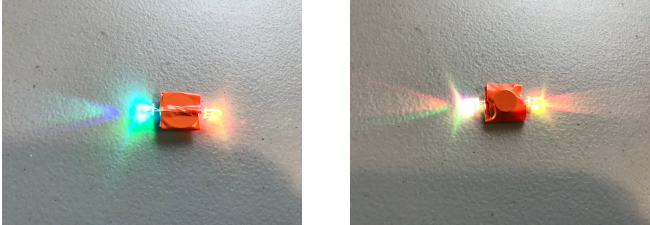
Step 1: Test
Polarity, the direction current flows in an electrical circuit, is important with LEDs. Always place your LED’s positive (+) leg on the positive side of the battery and its negative leg on the negative side.
Note: The longer leg of an LED is positive (+), and the shorter leg is negative (-). The negative leg is also the leg closest to the flat side of an LED.
1.1 Test your LEDs one at a time. Remember to place the positive (+) leg of each LED on the positive side of your battery and the negative (-) leg on the negative side.
-
If neither of the LEDs light up, try replacing your battery, then retest the LEDs.
-
If only one of the LEDs lights up, switch the direction of the legs on the bad LED. Replace it with a new one if it still doesn’t work.
-
When both LEDs light up, you’re ready to start building your Throwie.
(see Figure 1.1).
Step 2: Assemble
2.1 Attach your LEDs to the battery as seen in Figure 2.1 above.
Remember, the positive (+) leg of each LED goes on the positive side of the battery and the negative (-) leg on the negative side.
2.2 Cut a 3-inch piece of electrical tape and wrap it once around the battery and LED legs. Make sure the tape is securely attached to the battery and only wrap it around the battery once. Leave the extra tape loose (see Figure 2.2).
Note: The LED legs are taped securely against the battery to keep the electric current flowing.
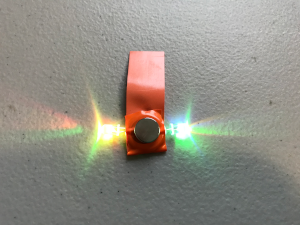
2.3 Carefully place the neodymium magnet on top of the battery (see Figure 2.3).
Note: LED Throwies will work without the neodymium magnet, but the magnet will attach your Throwies to strong metal objects.
2.4 Now fold the rest of the electrical tape over the magnet and around the battery (see Figure 2.4).
Challenge: We designed our Halloween LED Throwies to blink non-stop to keep things simple, but adding a built-in switch to your Throwie will allow you to turn the LEDs off when not in use.
A switch is the part of the circuit designed to open and close a gap in the circuit’s conductive path. How can you create a gap between your LED legs and the battery?
Step 3: Finish
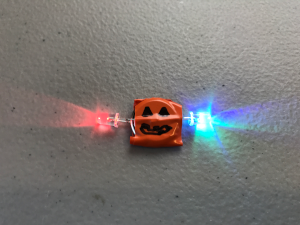
3.5 All that’s left is to decorate your Throwies with a spooky face. That’s it! (see Figure 3.5).